Section 3: Installing the 1Password Browser Plugin/Extension
There are many browsers supported by 1Password. We will only cover three: Firefox, Google Chrome, and Safari. The process for each installation varies considerably, so if you're installing for multiple browsers, it's good to be aware of the differences.
Firefox

Step 1: Visit the webpage
Click here:
https://1password.com/downloads/browser-extension/#browsers
Step 2: Select Firefox
Click on the "Install" button under the icon corresponding to the web browser you are using at the moment. In this instance, Firefox.

Step 3: Add the 1Password icon to your browser
Click on the "Add to Firefox" button:

Step 4: Permissions
Click on the "Add" button on the pop-up.

📌
Note: it is both OK and recommended to allow it the same permissions in Private Windows.
Step 5: Log into 1Password
If your toolbar icon looks like this, skip to the next step: 
If your toolbar icon looks like this:  please click it and unlock 1Password with your password or biometric auth.
Step 6: Install Complete - but we're not done!
1Password should now work for autofilling login information.
Step 7: Configure
In the Firefox browser, click on the 1Password icon next to the address bar and then click on the "menu" icon (circled in red below), then Settings... as shown:

There are two tabs you will need to change settings in:
- Autofill & save
- Accounts & vaults
Autofill & save
Click on the Autofill & save tab, and then disable "Offer to save and sign in with passkeys" because we currently do not use passkeys.
Make sure the vault selected next to "New items get saved in:" is set to your named vault e.g. John Doe. It should not be set to "Employee" or "Private" or anything else.

Accounts & vaults
Click on the Accounts & Vaults tab on the left. Uncheck Employee:

📌
As of May 1, 2024 the name of the "Private" vault has been changed to "Employee" for 1Password business accounts. This change was not made by us but by the developers of 1Password. Please continue to leave the Employee vault empty.
Step 8: Proceed to Section 5
You're done!... at least with this part. Please proceed to Section 5 to install 1Password on your phone or other mobile device. Note that Section 4 is optional. If you have any questions, contact IT for help.
If you are still having trouble, please see:
https://support.1password.com/missing-browser-button/
Chrome

Step 1: Visit this webpage
https://1password.com/downloads/browser-extension/#browsers
Step 2: Select Chrome
Click on the "Install" button under the icon corresponding to the web browser you are using at the moment.

Step 3: Add the 1Password icon to your browser
Click on the "Add to Chrome" button.

Step 4: Permissions
Click on the "Add Extension" button on the pop-up.

Step 5: Log into 1Password
You should see the 1Password icon appear in the top right corner, next to your search bar:

Click the icon and use your password (or TouchID!) to unlock - autofilling will not work until you unlock 1Password.
Step 6: Puzzle icon and pin

Step 7: Configure
In the Chrome browser, click on the 1Password icon next to the address bar and then click on the "menu" icon (circled in red below), then Settings... as shown:
There are two tabs you will need to change settings in:
- Autofill & save
- Accounts & vaults
Autofill & save
Click on the Autofill & save tab, and then disable "Offer to save and sign in with passkeys" because we currently do not use passkeys.
Make sure the vault selected next to "New items get saved in:" is set to your named vault e.g. John Doe. It should not be set to "Employee" or "Private" or anything else.
Accounts & vaults
Click on the Accounts & Vaults tab on the left. Uncheck Employee:
📌
As of May 1, 2024 the name of the "Private" vault has been changed to "Employee" for 1Password business accounts. This change was not made by us but by the developers of 1Password. Please continue to leave the Employee vault empty.
Step 8: Proceed to Section 5
You're done!... at least with this part. Please proceed to Section 5 to install 1Password on your phone or other mobile device. Note that Section 4 is optional. If you have any questions, contact IT for help.
Troubleshooting:
If you are running into issues please check these items:
- Disable other password managers. Window menu -> Extensions -> click the slider for other managers so that they are gray, not blue.
- In the same Extensions window, ensure 1Password's slider is blue.
- If you have just disabled other extensions, a browser restart may be needed for things to operate normally.
- Chrome ➝ Preferences ➝ Autofill ➝ Passwords should look like this:

- Be aware that when a page first loads you'll be offered usernames and passwords from 1Password (if 1Password is selected as your autofilling app in preferences, this should automatically occur, but might take disabling LP.) If you click elsewhere, the icon won't show up until your mouse has clicked on a user/pass field.
- If 1Password is still not offering logins, the URL might not be saved correctly. Less-specific URLs are often better than extremely specific (long) ones, but not always. The most common offender is a completely different domain for the same service e.g. https://www.microsoft.com/ and https://login.live.com/ - if you've saved microsoft.com and the login page is at login.live.com, autofill won't be offered at all. Just add the second URL under the first, no need to remove the first.
If you are still having trouble, please see: https://support.1password.com/missing-browser-button/
Chrome - Incognito Mode tip
In order to still be able to access 1Password while in incognito mode, please follow the instructions below to configure your browser.
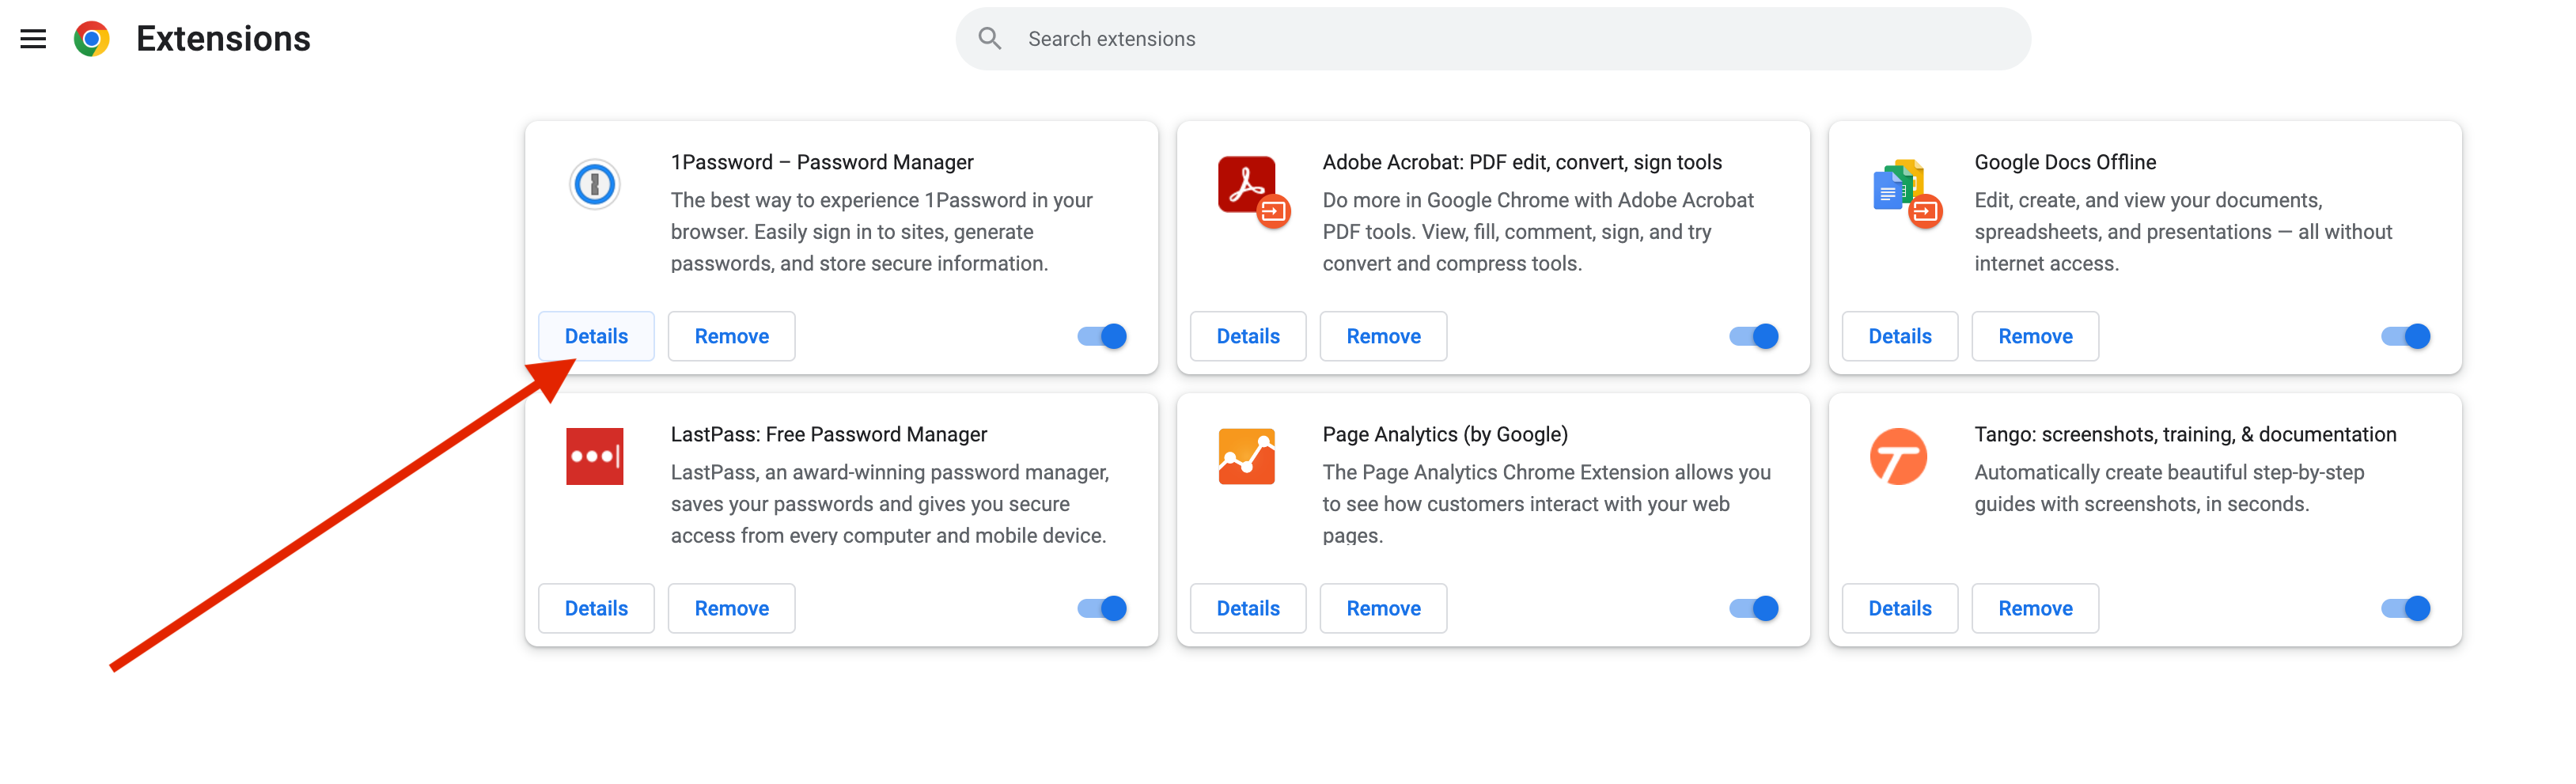
Step 1: Click on the puzzle icon in the top right corner of your browser, then click on Manage Extensions

Step 2: Click on Details in the 1Password box
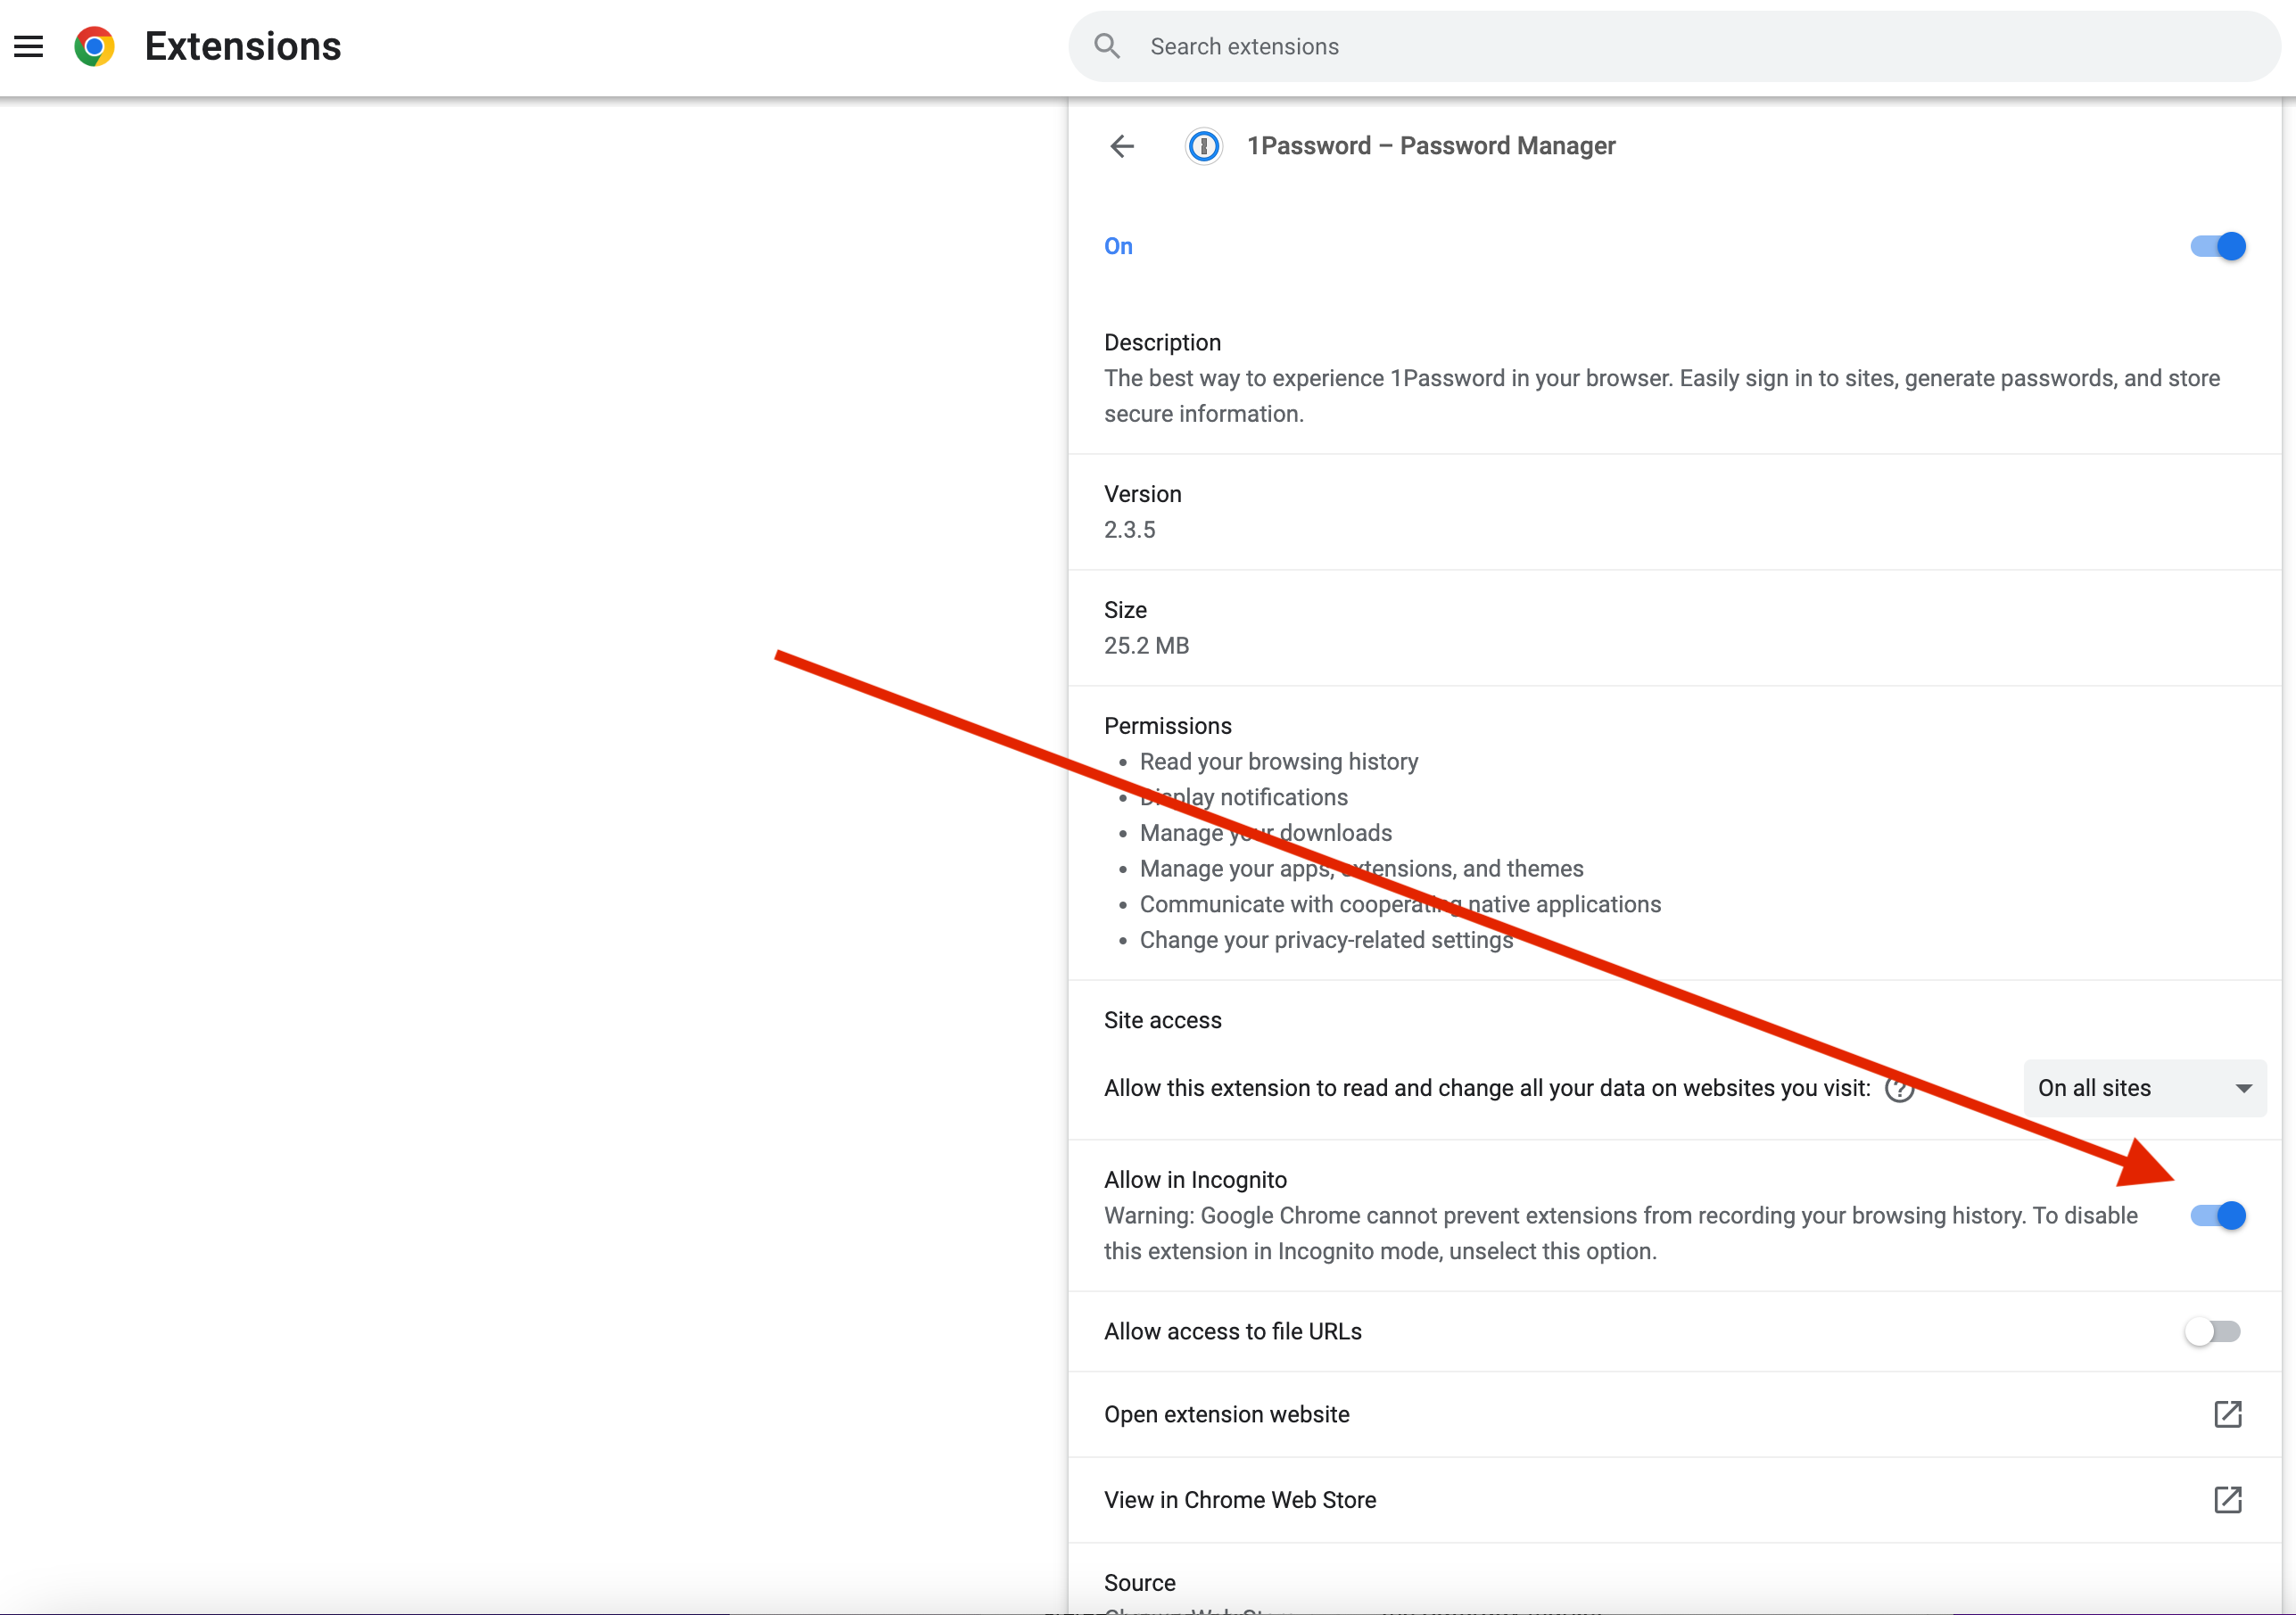
Step 3: Click on the switch to turn it blue
Safari

Step 1: Open the Self-Service app
Find the Self-Service app on your Dock and click to run the app. If the app is not located on your Dock, you can find it in the Applications folder using Finder. You can also quickly launch the app from Spotlight by using Command + Spacebar (⌘+ ).

Once the Self-Service app is running, click the Your Apps tab. 1Password for Safari should appear at the top. If it's not there, scroll until you find it or search by name.

Step 2: Install Now
Click the Install Now button under the app heading called 1Password for Safari and wait for the process to complete.

Step 3: Verify the extension is installed and enabled
Head up to the Safari menu ➝ Settings...

In the Settings window, go to the Extensions tab.
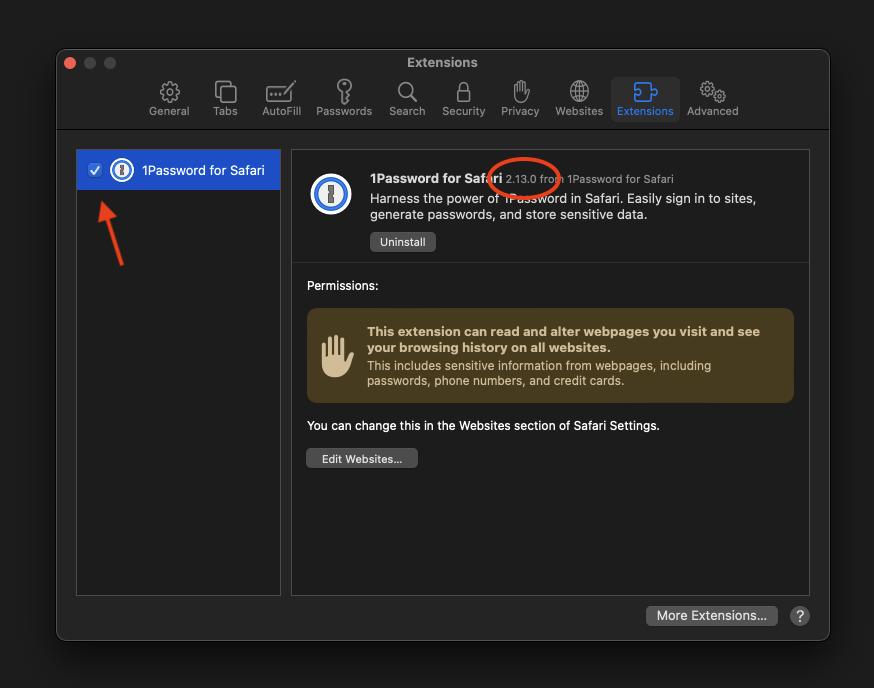
Verify that the 1Password extension has been installed:
- Make sure the check box next to "1Password for Safari" is checked. ✅
If the checkbox is unchecked, when checked for the first time you may be asked :
"Are you sure..."

Hit Turn On to activate the extension.
- Also, make sure the version number is
2.12.0or higher. - Finally, look at the top of an open Safari window. You should see the 1Password browser button now next to your search bar.

If the extension does not show up in the extensions list or the button does not show up either, try restarting Safari. If it still does not show up, contact IT for help.
Step 4: Log into 1Password
Click the 1Password browser button icon.
- If your toolbar icon looks like this:
 skip to Step 6.
 - If your toolbar icon looks like this:
 please click it and use your password (or TouchID!) to unlock - autofilling will not work until you unlock 1Password.
Step 5: Configure
In the Safari browser, click on the 1Password icon next to the address bar and then click on the "menu" icon (circled in red below), then Settings... as shown:
There are two tabs you will need to change settings in:
- Autofill & save
- Accounts & vaults
Autofill & save
Click on the Autofill & save tab, and then disable "Offer to save and sign in with passkeys" because we currently do not use passkeys.
Make sure the vault selected next to "New items get saved in:" is set to your named vault e.g. John Doe. It should not be set to "Employee" or "Private" or anything else.
Accounts & vaults
Click on the Accounts & Vaults tab on the left. Uncheck Employee:
📌
As of May 1, 2024 the name of the "Private" vault has been changed to "Employee" for 1Password business accounts. This change was not made by us but by the developers of 1Password. Please continue to leave the Employee vault empty.
Step 6: Proceed to Section 5
You're done!... at least with this part. Please proceed to Section 5 to install 1Password on your phone or other mobile device. Note that Section 4 is optional. If you have any questions, contact IT for help.