Password Management
1Password Guide and Recommended Practices
For all users, please read the following sections:
- Introduction
- Section 1
- Section 4 (optional)
- Section 6
- Section 7
- Section 8
- Section 9
The other sections (2, 3, & 5) can be skipped by users since they are used by IT to setup 1Password on your devices, but are left accessible here for reference.
- Introduction to 1Password
- Section 1: Starting Out with 1Password
- Section 2.1: 1Password App for Mac & Windows - Installation
- Section 2.2: 1Password App for Mac & Windows - Setup
- App Setup Method 1: Sign In with Account Details
- App Setup Method 2: Scan QR Code (requires mobile device)
- Section 3: Installing the 1Password Browser Plugin/Extension
- Section 4: Changing Your Master Password (Optional)
- Section 5: Installing 1Password on your Phone
- Section 6: Vaults
- Section 7: Items — How to Create
- Section 8: Passwords and URLs
- Section 9: 2FA/MFA
Introduction to 1Password

All passwords should be stored in 1Password, a flexible password manager available on all supported systems. The app on each system gives you access to all your passwords — and other important credentials — quickly and securely. Your account with 1Password also synchronizes across each 1Password app so all data is kept up-to-date.
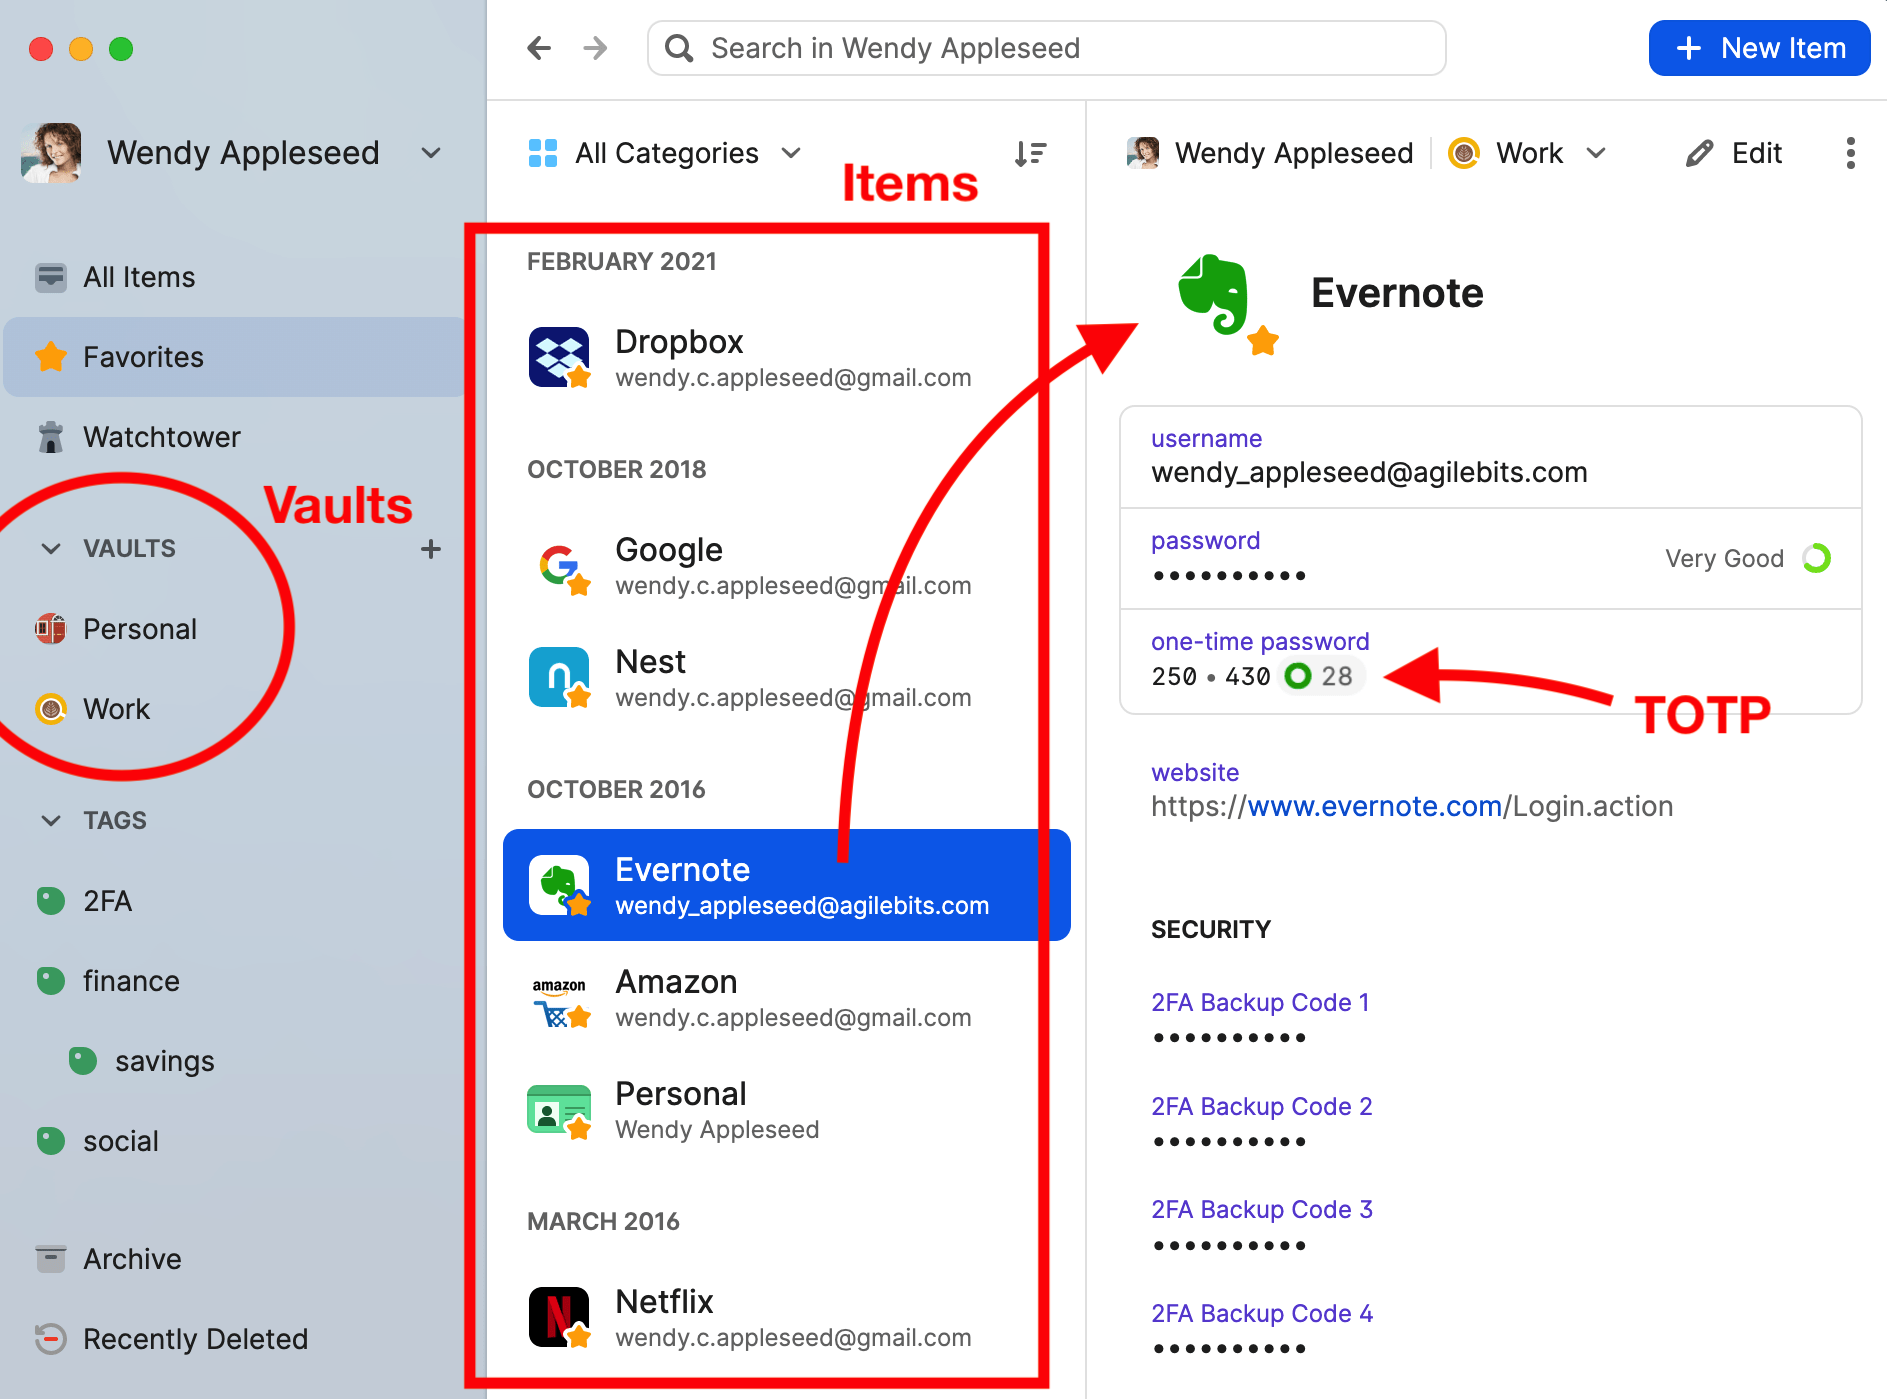
How 1Password Works
Organization is important when storing critical information like passwords. 1Password uses individual "Items" to store usernames and passwords for each account. These Items are then stored in individual "Vaults" which only specific people are granted access to. Generally, you will use one vault for yourself and in business settings, one or more shared vaults. You then use your master password to access your account, which in turn provides access to all applicable Vaults, so you only need to memorize one — and only one — password to access your other accounts.
📌
It should be noted that your macOS password (the one you use to log into your Mac) is different than your 1Password master password. You should still memorize your macOS password in addition to your 1Password master password because you can't use AutoFill from 1Password at your Mac's login screen. However, your macOS password is stored in 1Password if you need to look it up.
Items
You can think of these "Items" like individual pages or files locked in a filing cabinet, or a card in a rolodex locked inside a safe. These items are individual entries that can be customized to include all kinds of data beyond a username and password. It can store multiple passwords, pin numbers, website URLs, TOTPs (see 2FA/MFA for more on that), and even just regular notes and text. The general rule of thumb is to create and maintain a single Item for each account. Even if you have multiple accounts with the same company, each account should have its own item.
More information on Items can be found in Section 7.
Vaults
In the physical analogy mentioned before, "Vaults" can be thought of as the locked filing cabinet or safe. It's a container that holds all the Items created. Generally, you will only be concerned with a single Vault named with your personal name. In some cases, you may have access to other people's vaults for convenience such as your coworkers. The upshot being that if you save an item to the right vault, then everyone who needs access will have access automatically.
More information on Vaults can be found in Section 6.
Your Master Password
The "one" password used to access 1Password and your vaults is your master password. It is critical that you memorize this password. You should not write it down anywhere. If you forget your master password, there are procedures in place to reset or retrieve it. Since your master password has been chosen for you, it is not reasonable to expect immediate memorization. Instead, we lean on biometric auth (TouchID/FaceID) on at least one device (normally your phone) to remind you of the password for your computer. If you refuse to use biometric auth you should consider following the instructions to change your master password to one you are sure to remember. Those instructions can be found in Section 4: Changing Your Master Password.
The macOS App
Generally you'll use the 1Password app to create items, edit items, and look for items to retrieve information. You can also use a feature in the app called "open and fill" that will open a website address and automatically fill the username and password for you. The app is also the primary place that you will use your master password to unlock 1Password so the browser extension can be used.
You can find the macOS 1Password app in your Dock, in the Applications folder, or you can search for it using Spotlight Search.
The Browser Extension
The 1Password browser extension is the macOS app's connection to your web browser (FireFox, Chrome, or Safari). It's used to auto-fill usernames, passwords, etc from the items stored in 1Password.

Signing into a website
When signing into an online service, the browser extension will suggest a login item to use. Simply click in the field of either the username or password, and a card will pop up that shows the suggested item. If 1Password has more than one item associated with that website, you may see multiple options to choose from. Click the item name, and 1Password will fill the info for you.

Saving a login
When creating a new account on a website, 1Password can sometimes suggest usernames, passwords, and offer to store them in a new item for you. In the example below, a username and password have been entered into a form for account creation. The Save in 1Password button shows up when 1Password detects the account form is being filled out. If the Save in 1Password button is clicked, the 1Password extension will save your username and password, along with information entered into other fields.

📌
In some cases, it might be easier, less confusing, and less likely to create duplicate items for a login, if you manually create the login item in the 1Password app first, then copy the username, password, and other info from the item so you know it's accurate.
Starting with 1Password
Your first encounter with 1Password will likely be when we setup the app for you on your Mac or iPhone. Your account will have already been created for you along with your master password. Once the apps have been setup and properly configured, one of the first things we will do is show you where to find your master password. Conveniently, your one password is stored in an item in your named vault. This is covered in Section 1.
Please understand it is vital that we complete setup on both your primary workstation plus your smartphone and any other devices that you use to access accounts. This is to make sure you have access to your master password in the event that you forget it. It is very important to memorize your password, but with biometric authentication, generally you won't have to type your password every day. And in cases where you forget it, at least one device should be unlockable with biometric auth most of the time, so you can access your password to refresh your memory.
Section 1: Starting Out with 1Password
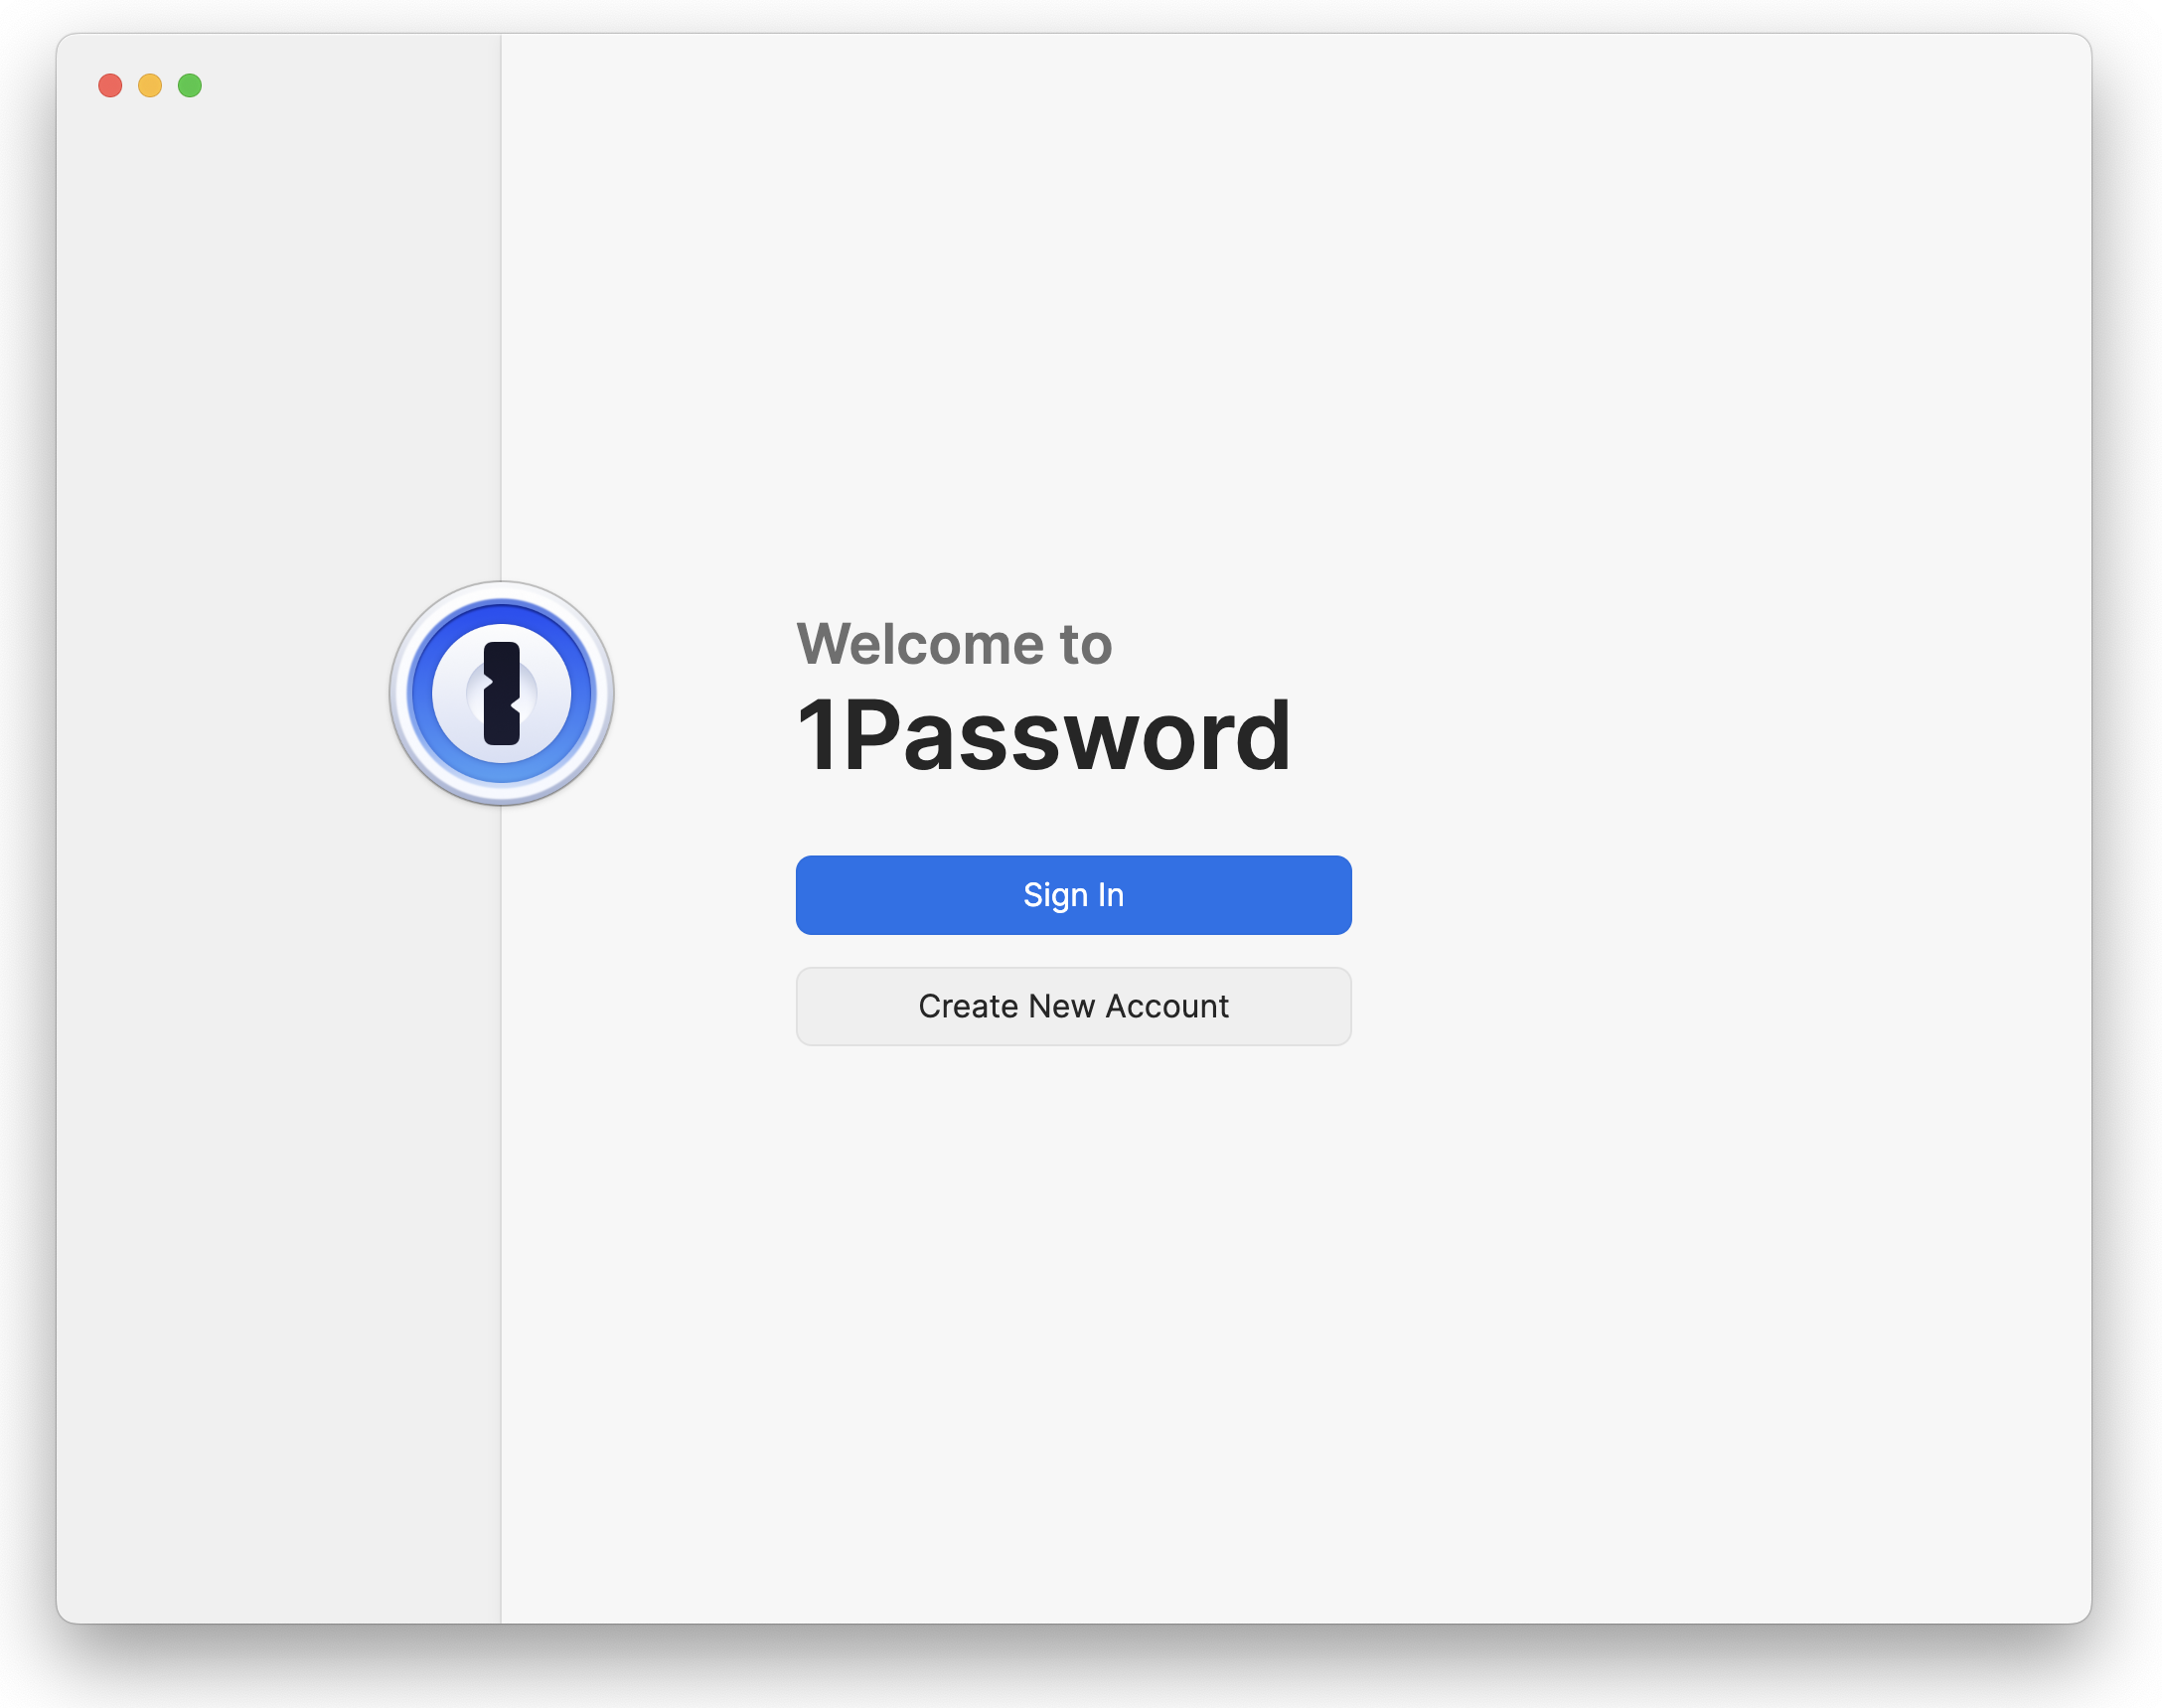
Welcome to 1Password
If this is your first time using 1Password, welcome! It may take some time getting used to using the password manager, but you'll quickly see how valuable this little app can be.
When starting off, one of the IT staff will be introducing you to the app and giving you your password. Installation of the Mac app is not required on your part, although it is covered in Section 2 for reference. Remember that it is very important that you memorize your password. Do not write it down or print it anywhere. If you forget your password, you can contact IT to retrieve it.
Unlocking the 1Password app on macOS
The app should already be installed on your Mac. You can launch the app by clicking on the 1Password app icon in the Dock. If the app is not located on your Dock, you can find it in the Applications folder using Finder. You can also quickly launch the app from Spotlight by using Command + Spacebar (⌘+ ).
If you already have your password, you can enter it in the field and press return on your keybaord. If you don't know your password or it hasn't been given to you yet, you can contact IT for assistance.

Biometric Authentication
Touch ID & Face ID
Since entering a password multiple times a day can be a bit of a pain, we like to lean on "Biometric Authentication" to make things easier and more convenient. There are currently two types of Apple branded Biometric Authentication available for use with 1Password. Touch ID and Face ID are both generally available on modern iPhones. For Macs, Touch ID is the only one available but requires certain hardware. If you are using a laptop, you can use the Touch ID sensor built into the keyboard. For desktop Macs, a Magic Keyboard is required to use Touch ID. If you don't have one of these, you will have to enter your password each time you unlock the 1Password app.
Entering your password every two weeks
For Mac users with Touch ID setup, you can unlock the 1Password app for up to two weeks if you've signed into the app with the password recently. You can make this time period more strict but our standard is currently two weeks. And, since your iPhone or laptop has Biometric Authentication as well, if you forget your 1Password master password, chances are good you can open either your laptop or iPhone with Biometric Authentication and retrieve your master password from your vault.
Where to find your password
Your password can be found in an item in your named vault. You should have access via either your smartphone or your Mac. You can either click on the vault with your name and scroll through the list of items until you find the item with "1Password" in the title, or use the search function at the top of the 1Password app. If you're having trouble finding it, contact IT.

Your password is in the password field and it can be revealed by hovering over the field, clicking the down arrow/chevron and clicking Reveal. You can also hold down option (a.k.a. alt) on your keyboard to reveal concealed secrets.
You may also notice the Secret Key. It is only used for setting up new devices so it can be safely ignored. You shouldn't need to use the Secret Key, but your IT tech team does. So, please do not modify or delete it.
⛔️ Please do not write down (or print) either the password or the Secret Key. The password is your "one" password — your master password — and memorization is critical. The Secret Key is only ever used for initial setup on devices, generally once per device+account. If you forget your "one" password, and you're not able to retrieve it on any device with Biometric Authentication, we can share your 1Password account info with you or reset as needed.
What next?
If the password is too difficult to remember, you do have the option to change it. That process is covered in Section 4. If you're unable or unwilling to use Biometric Authentication, it is recommended that you change your password to something that you are more likely to remember.
If you haven't already, you should install and setup the 1Password app for your iPhone. You can find setup instructions for the 1Password mobile app in Section 5. However, the IT staff will be assisting you in this process, so you're not required to do this alone.
Otherwise, continue to Section 6 for more reading on 1Password Vaults. To see how to create Items in 1Password, continue to Section 7.
Section 2.1: 1Password App for Mac & Windows - Installation
Installation can be done via two methods:
- Self-Service App (recommended) or...
- Manual download and Install
We will cover both here, but for convenience we recommend using the Self Service app.
Note: for Windows, you will need to do this process manually as there is no Self-Service app for Windows. This guide is intended for Mac but the general steps are similar.
App Install Method 1: Self-Service.app (recommended)
Installing 1Password app using the Self-Service app
Mosyle is a mobile device management system that allows us to deploy apps to managed devices without using Apple's Mac App Store. It's like a smaller "app store" that we curate to make installation easier. This curated "app store" can be found in the Self-Service app.
Step 1: Open the Self-Service app
Find the Self-Service app on your Dock and click to run the app. If the app is not located on your Dock, you can find it in the Applications folder using Finder. You can also quickly launch the app from Spotlight by using Command + Spacebar (⌘+ ).

Once the Self-Service app is running, click the Your Apps tab. 1Password 8 should appear at the top. If it's not there, scroll until you find it or search by name.

📌
Note: Please make sure you are installing 8 and not 7. Version 7 should no longer be available, but verifying you are installing version 8 is a good idea.
Step 2: Install Now
Click the Install Now button and wait for the process to complete.


Step 3: Open 1Password
Once the installation has finished, run the 1Password app. You can find the 1Password app in one of two ways:
- Open Finder, click on the Applications heading, and 1Password should be in your installed applications folder.

- Search for 1Password using Spotlight Search.
📌
Reminder: Default keyboard shortcut is Command + Spacebar (
⌘+) to bring up Spotlight, then type "1pass" and pressreturn.

Step 4: Place 1Password on the Dock (optional)
For convenience, you may wish to place the 1Password app icon somewhere else on your Dock. This step is optional but recommended.
Step 5: Proceed to Section 2.2!
Continue to Section 2.2 to sign into the app and configure it. If you have any questions, contact IT for help.
App Install Method 2: Manual Download
⚠️
Note: We do not recommend the full manual approach, but it is an option. We recommend using the Mosyle Self Service app method. If you have already installed the 1Password app, skip to Section 2.2 to sign in.
Step 1: Download
Click on the corresponding link, depending on your OS:
Mac: https://downloads.1password.com/mac/1Password.zip
Windows: https://downloads.1password.com/win/1PasswordSetup-latest.exe
Step 2: Install
Mac

Open the 1Password.zip file, and then run 1Password Installer app.
📌
Note: Depending on your Finder settings, the app name may not include the
.appfilename extension. It may also be automatically unzipped for you, in which case you will only see the Installer app and not the.ZIPfile.

You may encounter a warning that the app is downloaded from the internet. This is normal. Hit Open to continue.

You may also be asked to enter a password to install.

Please use your OS password for this install, the same as the one you use to login to your machine.

Once the installation is finished, 1Password should appear in your Dock. Start it up and continue with Step 3.

⊞ Windows
Run the 1PasswordSetup-latest.exe to begin the installation and follow the onscreen instructions to completion
Step 3: Proceed to Section 2.2!
Continue to Section 2.2 to sign into the app and configure it. If you have any questions, contact IT for help.
Section 2.2: 1Password App for Mac & Windows - Setup
Now that the 1Password app has been installed on your computer, it's time to sign in and configure it. The primary way of signing into the 1Password app for Mac or Windows is to use the Account Details. A second way to sign in, if the account is already signed into the 1Password mobile app (e.g. on iPhone), is to scan a QR code. This is slightly different than scanning a QR code to sign in on the mobile app, but the process is very similar.
Generally you should not have to setup the 1Password app for macOS or Windows; the IT tech team will do this for you. Please contact IT if you have any questions.
App Setup Method 1: Sign In with Account Details
![]()
Sign in and Configure the 1Password App with Account Details
For this section you will need your Account Details from Section 1:
- Sign-in Address
- Email Address (a.k.a. username)
- Secret Key (a.k.a. Access Key)
- Password (a.k.a. your master password)
You won't be able to complete the sign in process without them. You should have them open in a browser window if you've already completed Section 1. See Section 1: Retrieving Your 1Password Account Info if you haven't.
If this isn't the first computer you're setting up with the 1Password app, these Account Details can be found in your Vault. If you're unable to retrieve your account details, contact IT for assistance.
Once you have access to your Account Details, continue with Step 1 of this section.
You will also need the 1Password app installed and open. Installation is covered in Section 2.1.
Step 1: Sign In
Click Sign In to begin the process of adding your account to the app.
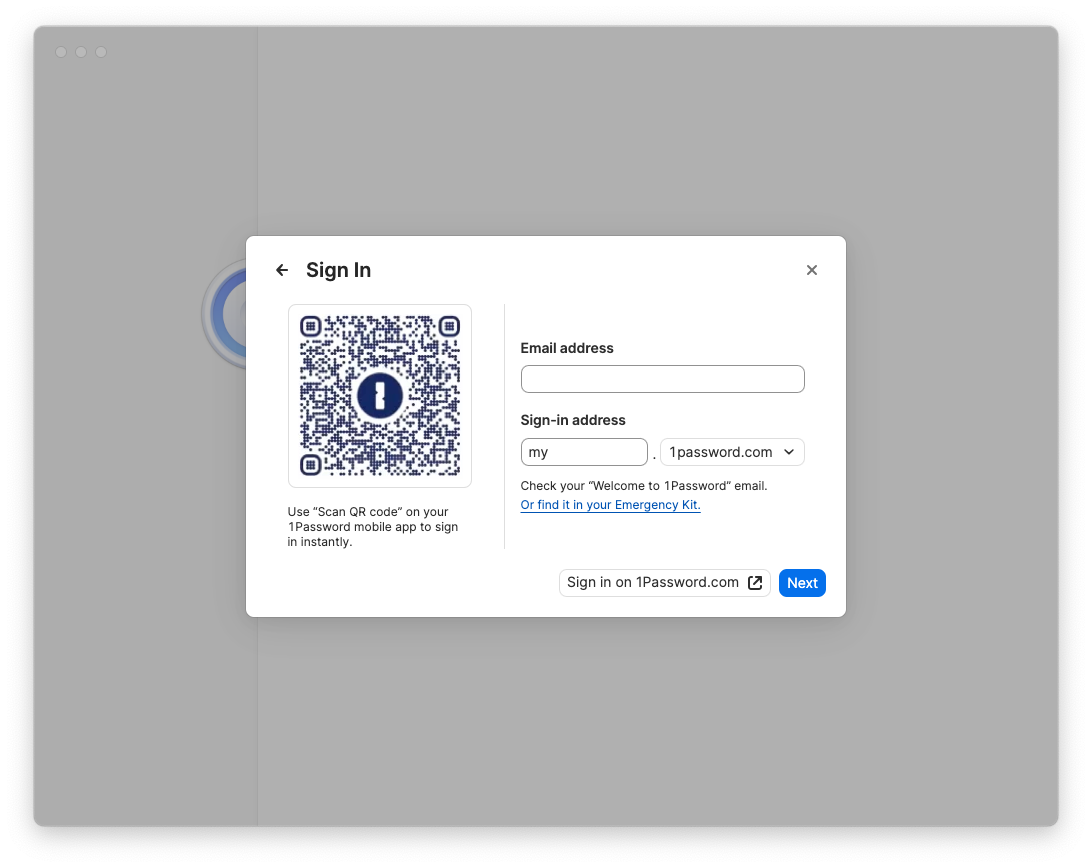
You will be prompted to enter the Email address and Sign-in address for the account. Enter them and click Next.
Next you need to enter the Secret Key and the Password.
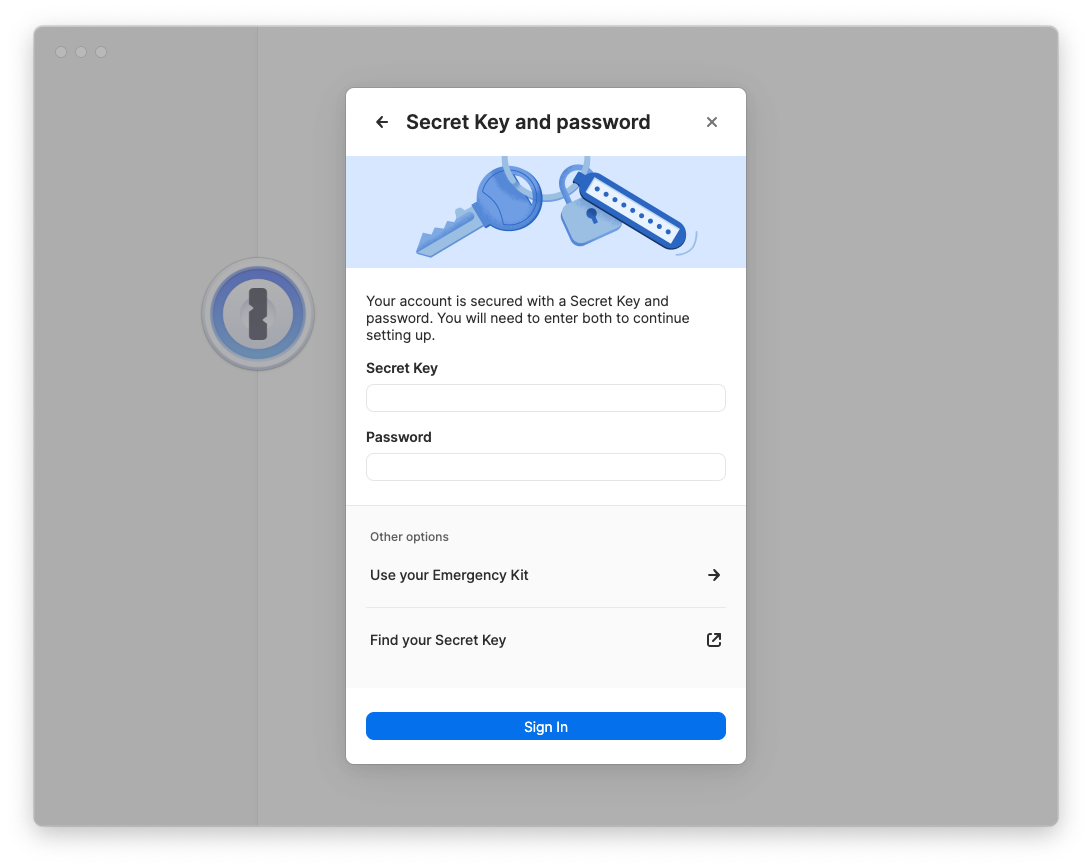
The Sign-In Address is the same for everyone, but your email, Secret Key, and Password are unique to your account. If you can't find these, you will need to retrieve them, which is covered in Section 1.
Once the account info is entered, click Sign In.
🧠
Remember: Please do not write down (or print) either the Password or the Secret Key. The password is your "one" password, your master password, and your memorization of it is critical. The Secret Key is kept safe by the IT staff if you need it in the future.
📌
Note: If you find that your password is difficult for you to type or remember, you do have the option of changing it later. If you'd like to change your master password, the process is covered in Section 4.
Step 2: Configure
Make sure the 1Password app is active/focused by clicking on its window or the app icon in the Dock.
You will need to change settings in three different tabs:
- General
- Security
- Privacy

General
In the General tab, under the Default Vault heading, change the Save new items in: setting from "Suggest a vault" or "Employee" or "Private" to your named vault e.g. John Doe.
To be clear: Default Vault should be the user, not Employee.
📌
As of May 1, 2024 the name of the "Private" vault has been changed to "Employee" for 1Password business accounts. This change was not made by us but by the developers of 1Password. Please continue to leave the Employee vault empty.
Security
If the device has Touch ID, make sure it is enabled if you are Ok with using Biometric Authentication. Set "Confirm my account password:" to Every 2 weeks (14 days). This setting will allow you to unlock 1Password with the Touch ID sensor rather than entering your password. However, this will only work for 14 days before you will need to enter your password again to start another 14 day period.
Under the Auto-lock heading, set the "Lock after the computer is idle for:" setting to 8 hours. For comparison, your computer should "lock" after a period of idle time when you're not using it (i.e. not typing or moving the mouse) at which point you will need to enter your macOS password (different from your 1Password password). This setting is similar to that, but in this case, the 1Password app will lock after the computer has been idle for 8 hours. At which point you will need to use Touch ID or enter your 1Password password.
Finally, under the Concealed Fields heading, enable the "Hold Option to toggle revealed fields" setting. This is a handy little feature that most users won't use, but IT uses it consistently. If you hold option (aka alt) on your keyboard while in the 1Password app, it will reveal concealed secrets like passwords.
Feel free to lock this down further; these are the minimums. For Example, setting "Lock after the computer is idle" to 4 hours, rather than just 8 hours.
Privacy
Under the Watchtower heading, disable the setting labeled "Check for passkeys" because we do not use passkeys currently.
To reiterate: These are the standardized settings you should have..
General Tab
- Default Vault
Save new items in:should be set to your named vault e.g.John Doe. It should not be set to "Employee" or "Private" or "Suggest a vault".Security Tab
- Unlock: Touch ID should be enabled for Mac (if available) ✅
- Auto-Lock:
- Set
Lock after the computer is idle for:to 8 hours. You may set a more strict time such as 4 hours.- Check ✅
Lock on sleep...- Clipboard:
- Check ✅
Remove copied information...- Uncheck 🔲
Use Universal Clipboard...- Concealed Fields:
- Uncheck 🔲
Always show passwords...- Check ✅
Hold Option to toggle revealed fieldsPrivacy
- Watchtower
- Uncheck 🔲
Check for passkeys
Close the Settings window after you have finished with both the General and Security settings.
Step 3: Proceed to Section 3!
You're done!... at least with this part. Continue to Section 3 to install the browser plugin/extension of your choice. If you have any questions, contact IT for help.
App Setup Method 2: Scan QR Code (requires mobile device)
Sign in and Configure the 1Password App with Your Mobile Device
For this section you will need your mobile device (iPhone, Android, etc) with the 1Password app installed and already signed in. If you've never signed into the 1Password app on your mobile device, you will not be able to proceed with this method of Mac/Windows app setup.
If you're not sure what to do, contact IT and they can help.
You will also need the Mac/Windows 1Password app installed and open. Installation is covered in Section 2.1.
Step 1: Click Sign In to Show the QR Code
Click Sign In to begin the process of adding your account to the app.

The Sign In prompt will appear. On the left side there is a QR code that you will need to scan with your mobile device.

Step 2: Scan the QR code with Your Mobile Device
Open the 1Password app on your mobile device. Tap the icon in the top left to bring up the menu. Tap the option for Scan QR Code... and then maneuver your mobile device's camera to capture the QR code displayed in the Mac/Windows 1Password app.
Once the mobile app recognizes the QR code, tap the button to Allow Full Access and the Mac/Windows app will sign in to the account automatically.
Step 3: Configure
Make sure the 1Password app is active/focused by clicking on its window or the app icon in the Dock.
You will need to change settings in three different tabs:
- General
- Security
- Privacy
General
In the General tab, under the Default Vault heading, change the Save new items in: setting from "Suggest a vault" or "Employee" or "Private" to your named vault e.g. John Doe.
To be clear: Default Vault should be the user, not Employee.
📌
As of May 1, 2024 the name of the "Private" vault has been changed to "Employee" for 1Password business accounts. This change was not made by us but by the developers of 1Password. Please continue to leave the Employee vault empty.
Security
If the device has Touch ID, make sure it is enabled if you are Ok with using Biometric Authentication. Set "Confirm my account password:" to Every 2 weeks (14 days). This setting will allow you to unlock 1Password with the Touch ID sensor rather than entering your password. However, this will only work for 14 days before you will need to enter your password again to start another 14 day period.
Under the Auto-lock heading, set the "Lock after the computer is idle for:" setting to 8 hours. For comparison, your computer should "lock" after a period of idle time when you're not using it (i.e. not typing or moving the mouse) at which point you will need to enter your macOS password (different from your 1Password password). This setting is similar to that, but in this case, the 1Password app will lock after the computer has been idle for 8 hours. At which point you will need to use Touch ID or enter your 1Password password.
Finally, under the Concealed Fields heading, enable the "Hold Option to toggle revealed fields" setting. This is a handy little feature that most users won't use, but IT uses it consistently. If you hold option (aka alt) on your keyboard while in the 1Password app, it will reveal concealed secrets like passwords.
Feel free to lock this down further; these are the minimums. For Example, setting "Lock after the computer is idle" to 4 hours, rather than just 8 hours.
Privacy
Under the Watchtower heading, disable the setting labeled "Check for passkeys" because we do not use passkeys currently.
To reiterate: These are the standardized settings you should have..
General Tab
- Default Vault
Save new items in:should be set to your named vault e.g.John Doe. It should not be set to "Employee" or "Private" or "Suggest a vault".Security Tab
- Unlock: Touch ID should be enabled for Mac (if available) ✅
- Auto-Lock:
- Set
Lock after the computer is idle for:to 8 hours. You may set a more strict time such as 4 hours.- Check ✅
Lock on sleep...- Clipboard:
- Check ✅
Remove copied information...- Uncheck 🔲
Use Universal Clipboard...- Concealed Fields:
- Uncheck 🔲
Always show passwords...- Check ✅
Hold Option to toggle revealed fieldsPrivacy
- Watchtower
- Uncheck 🔲
Check for passkeys
Close the Settings window after you have finished with both the General and Security settings.
Step 4: Proceed to Section 3!
You're done!... at least with this part. Continue to Section 3 to install the browser plugin/extension of your choice. If you have any questions, contact IT for help.
Section 3: Installing the 1Password Browser Plugin/Extension
There are many browsers supported by 1Password. We will only cover three: Firefox, Google Chrome, and Safari. The process for each installation varies considerably, so if you're installing for multiple browsers, it's good to be aware of the differences.
Firefox

Step 1: Visit the webpage
Click here:
https://1password.com/downloads/browser-extension/#browsers
Step 2: Select Firefox
Click on the "Install" button under the icon corresponding to the web browser you are using at the moment. In this instance, Firefox.

Step 3: Add the 1Password icon to your browser
Click on the "Add to Firefox" button:

Step 4: Permissions
Click on the "Add" button on the pop-up.

📌
Note: it is both OK and recommended to allow it the same permissions in Private Windows.
Step 5: Log into 1Password
If your toolbar icon looks like this, skip to the next step: 
If your toolbar icon looks like this:  please click it and unlock 1Password with your password or biometric auth.
Step 6: Install Complete - but we're not done!
1Password should now work for autofilling login information.
Step 7: Configure
In the Firefox browser, click on the 1Password icon next to the address bar and then click on the "menu" icon (circled in red below), then Settings... as shown:

There are two tabs you will need to change settings in:
- Autofill & save
- Accounts & vaults
Autofill & save
Click on the Autofill & save tab, and then disable "Offer to save and sign in with passkeys" because we currently do not use passkeys.
Make sure the vault selected next to "New items get saved in:" is set to your named vault e.g. John Doe. It should not be set to "Employee" or "Private" or anything else.

Accounts & vaults
Click on the Accounts & Vaults tab on the left. Uncheck Employee:

📌
As of May 1, 2024 the name of the "Private" vault has been changed to "Employee" for 1Password business accounts. This change was not made by us but by the developers of 1Password. Please continue to leave the Employee vault empty.
Step 8: Proceed to Section 5
You're done!... at least with this part. Please proceed to Section 5 to install 1Password on your phone or other mobile device. Note that Section 4 is optional. If you have any questions, contact IT for help.
If you are still having trouble, please see:
https://support.1password.com/missing-browser-button/
Chrome

Step 1: Visit this webpage
https://1password.com/downloads/browser-extension/#browsers
Step 2: Select Chrome
Click on the "Install" button under the icon corresponding to the web browser you are using at the moment.

Step 3: Add the 1Password icon to your browser
Click on the "Add to Chrome" button.

Step 4: Permissions
Click on the "Add Extension" button on the pop-up.

Step 5: Log into 1Password
You should see the 1Password icon appear in the top right corner, next to your search bar:

Click the icon and use your password (or TouchID!) to unlock - autofilling will not work until you unlock 1Password.
Step 6: Puzzle icon and pin

Step 7: Configure
In the Chrome browser, click on the 1Password icon next to the address bar and then click on the "menu" icon (circled in red below), then Settings... as shown:
There are two tabs you will need to change settings in:
- Autofill & save
- Accounts & vaults
Autofill & save
Click on the Autofill & save tab, and then disable "Offer to save and sign in with passkeys" because we currently do not use passkeys.
Make sure the vault selected next to "New items get saved in:" is set to your named vault e.g. John Doe. It should not be set to "Employee" or "Private" or anything else.
Accounts & vaults
Click on the Accounts & Vaults tab on the left. Uncheck Employee:
📌
As of May 1, 2024 the name of the "Private" vault has been changed to "Employee" for 1Password business accounts. This change was not made by us but by the developers of 1Password. Please continue to leave the Employee vault empty.
Step 8: Proceed to Section 5
You're done!... at least with this part. Please proceed to Section 5 to install 1Password on your phone or other mobile device. Note that Section 4 is optional. If you have any questions, contact IT for help.
Troubleshooting:
If you are running into issues please check these items:
- Disable other password managers. Window menu -> Extensions -> click the slider for other managers so that they are gray, not blue.
- In the same Extensions window, ensure 1Password's slider is blue.
- If you have just disabled other extensions, a browser restart may be needed for things to operate normally.
- Chrome ➝ Preferences ➝ Autofill ➝ Passwords should look like this:

- Be aware that when a page first loads you'll be offered usernames and passwords from 1Password (if 1Password is selected as your autofilling app in preferences, this should automatically occur, but might take disabling LP.) If you click elsewhere, the icon won't show up until your mouse has clicked on a user/pass field.
- If 1Password is still not offering logins, the URL might not be saved correctly. Less-specific URLs are often better than extremely specific (long) ones, but not always. The most common offender is a completely different domain for the same service e.g. https://www.microsoft.com/ and https://login.live.com/ - if you've saved microsoft.com and the login page is at login.live.com, autofill won't be offered at all. Just add the second URL under the first, no need to remove the first.
If you are still having trouble, please see: https://support.1password.com/missing-browser-button/
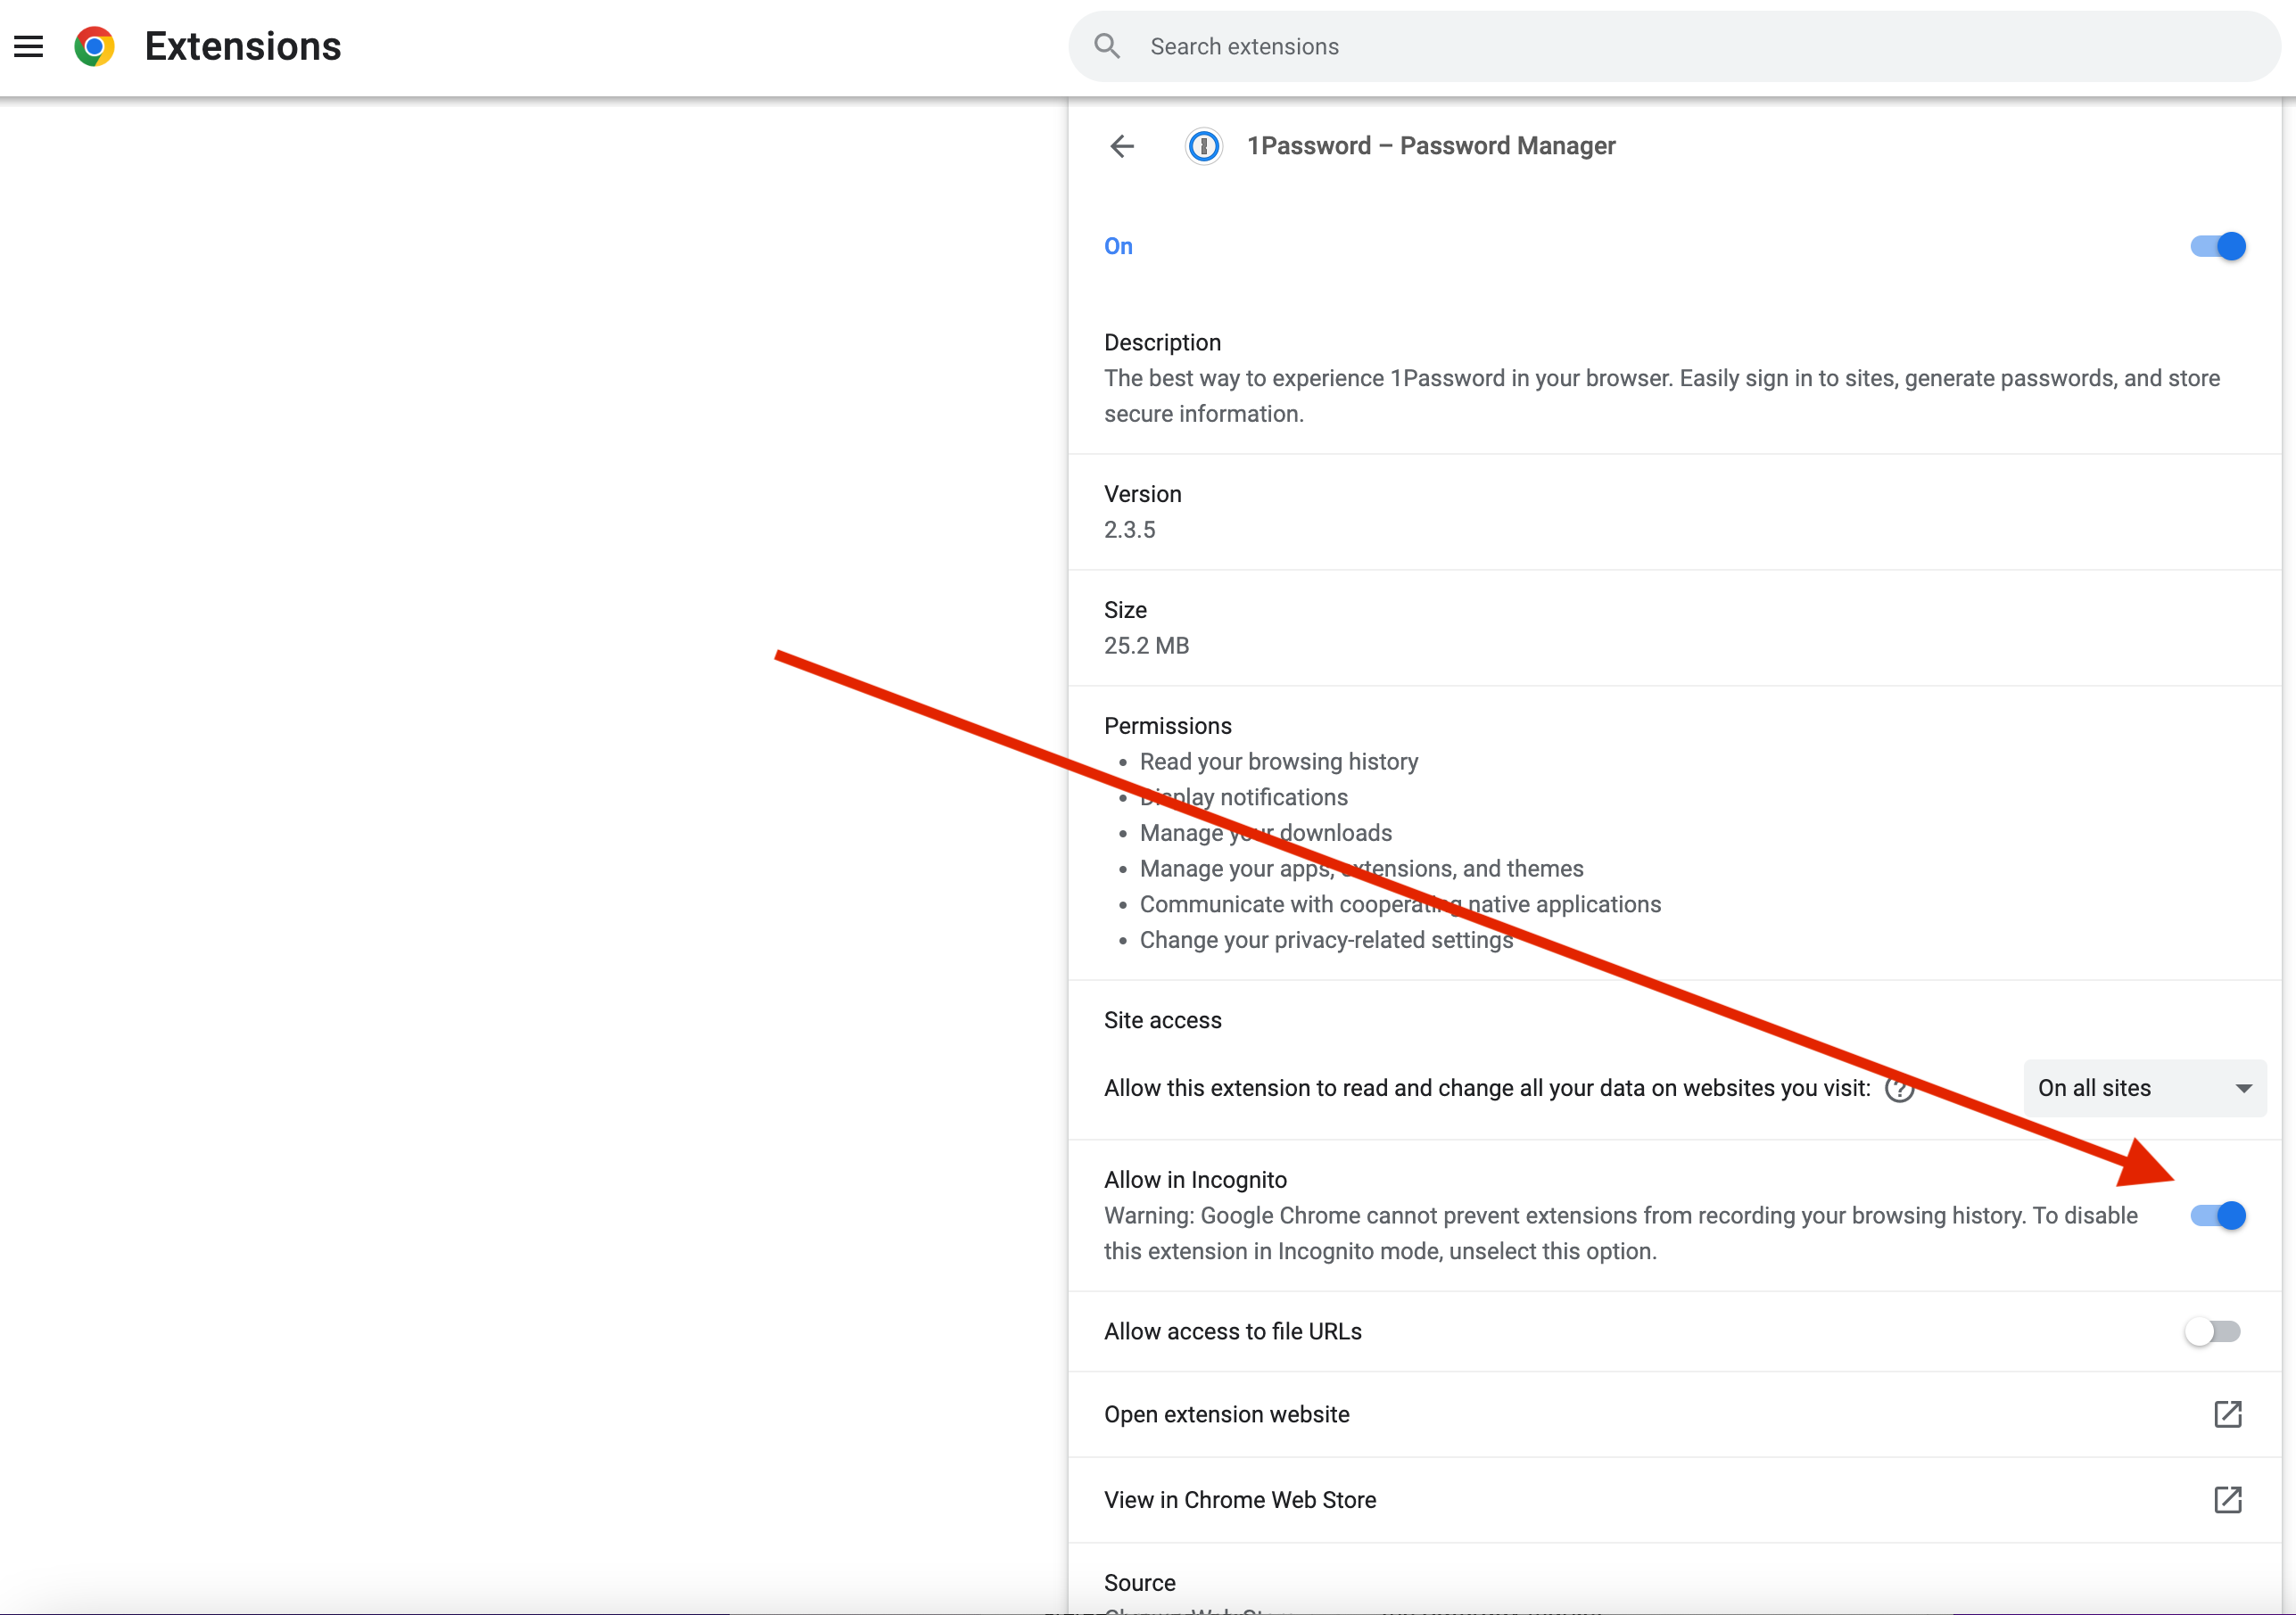
Chrome - Incognito Mode tip
In order to still be able to access 1Password while in incognito mode, please follow the instructions below to configure your browser.
Step 1: Click on the puzzle icon in the top right corner of your browser, then click on Manage Extensions

Step 2: Click on Details in the 1Password box
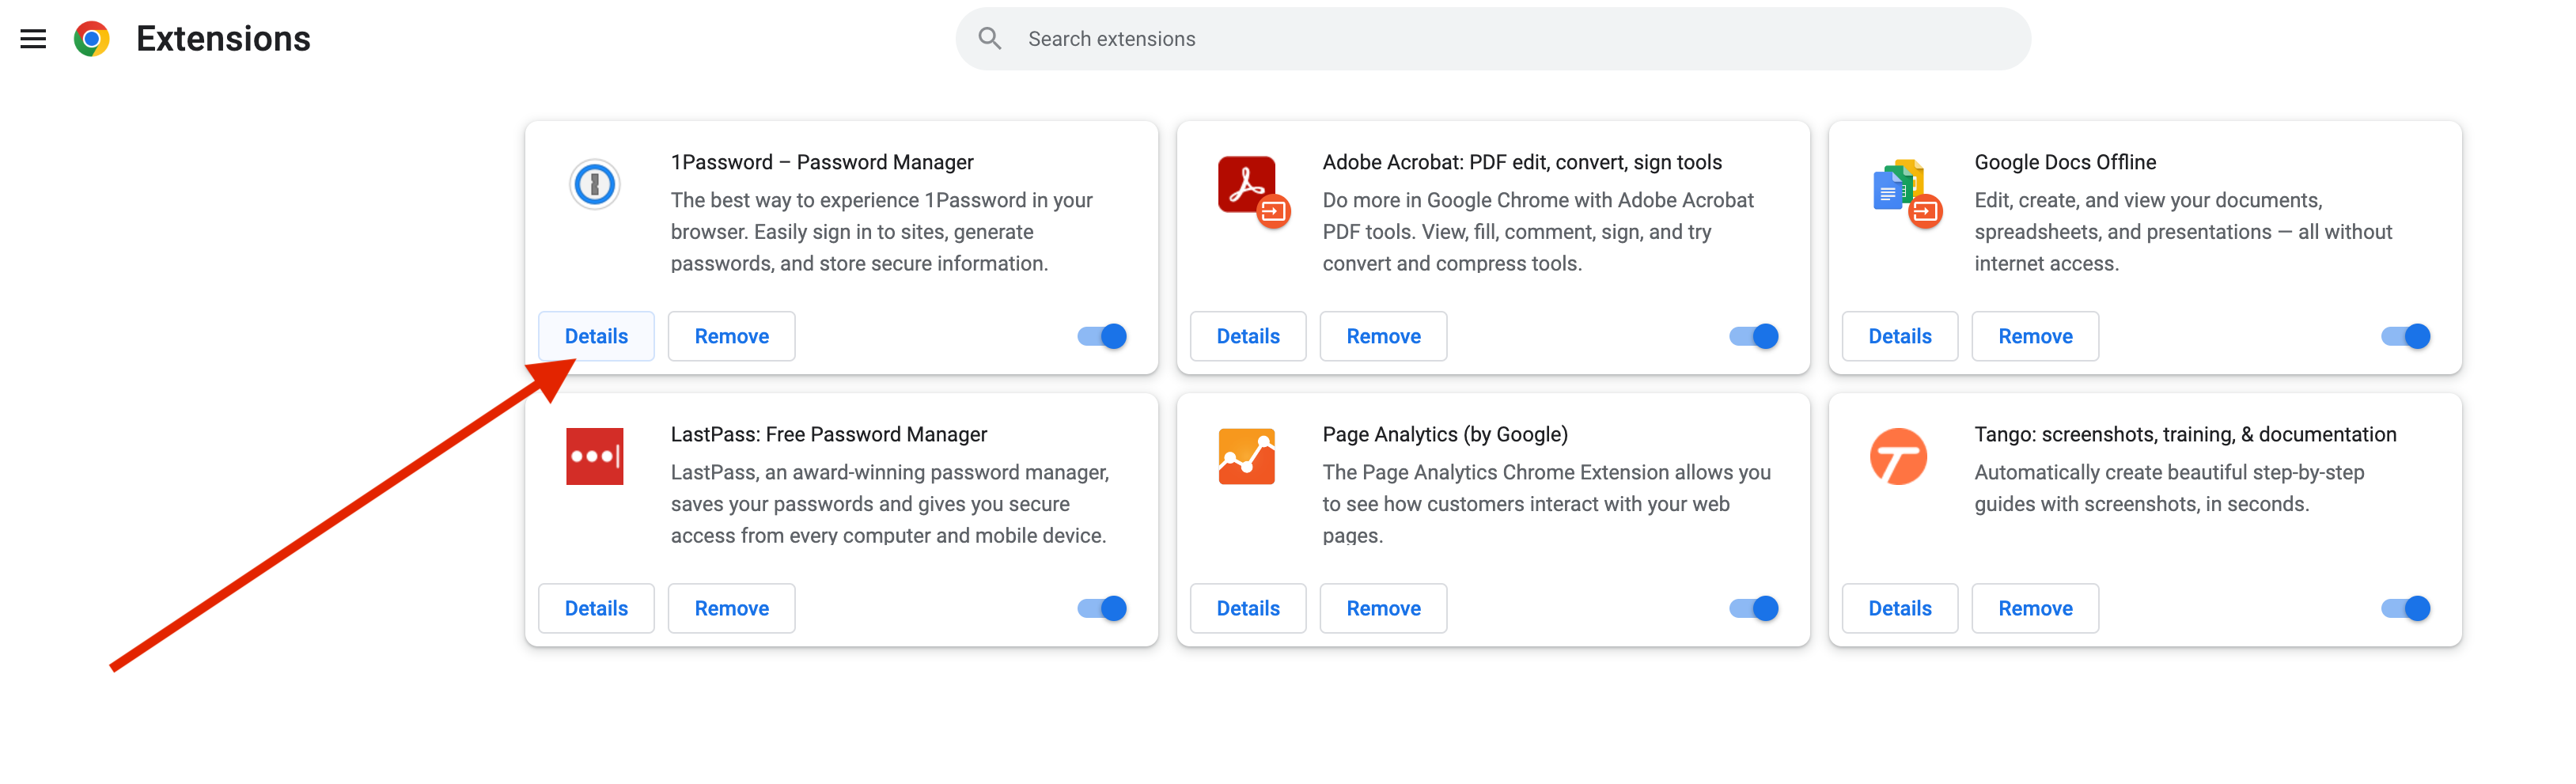
Step 3: Click on the switch to turn it blue
Safari

Step 1: Open the Self-Service app
Find the Self-Service app on your Dock and click to run the app. If the app is not located on your Dock, you can find it in the Applications folder using Finder. You can also quickly launch the app from Spotlight by using Command + Spacebar (⌘+ ).
Once the Self-Service app is running, click the Your Apps tab. 1Password for Safari should appear at the top. If it's not there, scroll until you find it or search by name.

Step 2: Install Now
Click the Install Now button under the app heading called 1Password for Safari and wait for the process to complete.

Step 3: Verify the extension is installed and enabled
Head up to the Safari menu ➝ Settings...

In the Settings window, go to the Extensions tab.
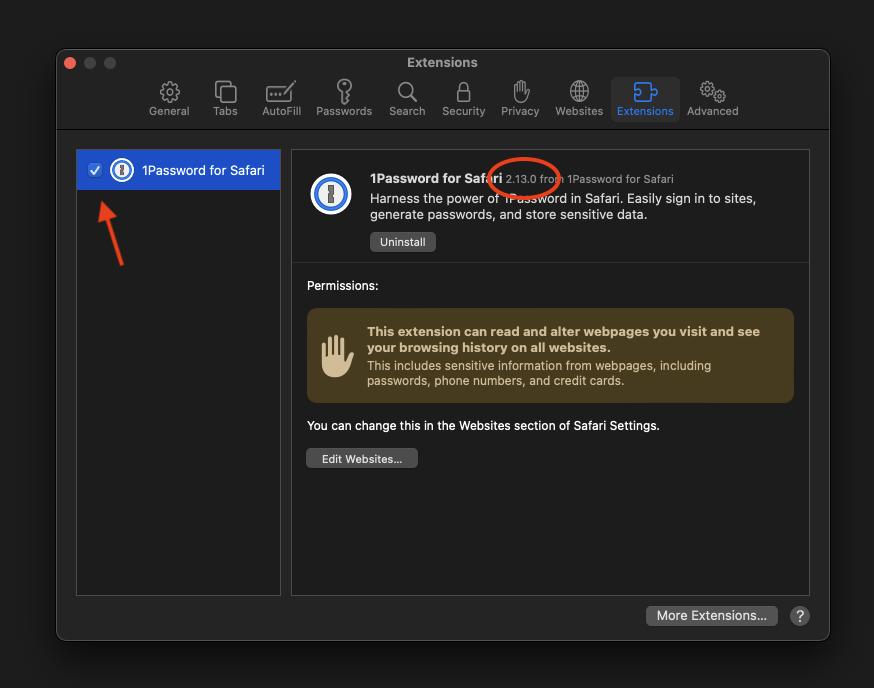
Verify that the 1Password extension has been installed:
- Make sure the check box next to "1Password for Safari" is checked. ✅
If the checkbox is unchecked, when checked for the first time you may be asked :
"Are you sure..."

Hit Turn On to activate the extension.
- Also, make sure the version number is
2.12.0or higher. - Finally, look at the top of an open Safari window. You should see the 1Password browser button now next to your search bar.

If the extension does not show up in the extensions list or the button does not show up either, try restarting Safari. If it still does not show up, contact IT for help.
Step 4: Log into 1Password
Click the 1Password browser button icon.
- If your toolbar icon looks like this:
 skip to Step 6.
 - If your toolbar icon looks like this:
 please click it and use your password (or TouchID!) to unlock - autofilling will not work until you unlock 1Password.
Step 5: Configure
In the Safari browser, click on the 1Password icon next to the address bar and then click on the "menu" icon (circled in red below), then Settings... as shown:
There are two tabs you will need to change settings in:
- Autofill & save
- Accounts & vaults
Autofill & save
Click on the Autofill & save tab, and then disable "Offer to save and sign in with passkeys" because we currently do not use passkeys.
Make sure the vault selected next to "New items get saved in:" is set to your named vault e.g. John Doe. It should not be set to "Employee" or "Private" or anything else.
Accounts & vaults
Click on the Accounts & Vaults tab on the left. Uncheck Employee:
📌
As of May 1, 2024 the name of the "Private" vault has been changed to "Employee" for 1Password business accounts. This change was not made by us but by the developers of 1Password. Please continue to leave the Employee vault empty.
Step 6: Proceed to Section 5
You're done!... at least with this part. Please proceed to Section 5 to install 1Password on your phone or other mobile device. Note that Section 4 is optional. If you have any questions, contact IT for help.
Section 4: Changing Your Master Password (Optional)
How to change the master password to your 1Password account.
If you find the password created for your account to be too difficult to remember or type, you have the option of changing your password to something else. However, you should keep in mind that there are certain requirements for what the new password can be — which you'll see in a later step.
For this guide to work, you must already have your password, be signed into the macOS 1Password app, and be signed into the 1Password app on your iPhone.
Note...
Recording Your Password...
It's fairly straightforward to change your master password for your 1Password account. However there is an added complication that you must also record that change in the 1Password Item in your Vault. If the new password is not recorded correctly, it may cause problems in the future. But one benefit of recording it in the 1Password Item is the optional use of the password generator built into the 1Password app. You will see this in later steps. This section will guide you through the process of changing your password and adding it to the 1Password Item in your Vault.
Be Aware of Time... 🕓 ⚠️
It is recommended that you read through this entire section first before proceeding with following the steps. Because the 1Password website will sign you out if inactive for 10 minutes, it can cause frustration if the process is not completed within that time limit. It is also recommended that you read Section 8 (particularly on Password Generation) before following the steps in this section. Having an idea of what your new password should be beforehand will save time and avoid having to sign into the website again.
A Point of Confusion...
Also, be aware that changing passwords stored in items within 1Password does not change the passwords for the website/service/account it's meant for. 1Password is only a repository of information; they're recorded, just as you would if written to a text file or even a sticky note (though much more secure!). There is no connection (magical or otherwise) that will change the password for an account if you modify the password recorded in the 1Password item. The only way to change the password for your 1Password account is on the 1Password website, and the Item with your account info will not be updated automatically for you. That is why you must do it manually.
Step 1: Sign into your account on 1Password.com
For this you will need to open the Item in the 1Password app which contains your account info.

Hover over the "website" field until the area is highlighted and you see the text "Open and fill" appear. Click it and a new browser tab will open and load the website for 1Password.

If your default web browser already has the 1Password browser extension (plug-in) installed on it, you should be automatically signed in and greeted with the following message.

At this point if you see the above message, you can skip to Step 2 and continue. However if you are greeted with the following web page, try Option 1 or Option 2.

Option 1 - Scan the QR Code
If you've already got the 1Password app setup on your iPhone (covered in Section 5), you can scan the QR code that appears on the website using the 1Password app. Follow the instructions on the website or as follows:
- Open 1Password on a mobile device where you’re signed in.
- Select the account icon or 1Password logo in the top corner.
- Choose “Scan QR Code.”
If successful, you should be logged into the website and you can skip to Step 2 and continue.
Option 2 - Copy Account Details
If you've tried everything so far but it hasn't worked, this is the last method to try. It requires copying your account details from the Item in 1Password. There are 3 details to enter:
- Username (your email address)
- The Secret Key
- Password (you master password)
Click in the field for "Email" on the now loaded 1Password website. If the email address for the account doesn't autofill, copy the email address from the 1Password Item by hovering your mouse cursor over the "username" field until the text "Copy" appears, then click.

Paste the email address into the field on the webpage. Click "Continue" to proceed.

On the next page, you will see fields for "Email", "Secret Key", and "Password". Copy the "Secret Key" from the 1Password Item in the 1Password app and paste it into its respective field on the webpage. Type in your master password into the "Password" field and click "Sign In" to continue.

📌 Note:
You can ignore the message about an Emergency Kit. We do not use it.
If all else fails, contact IT for help.
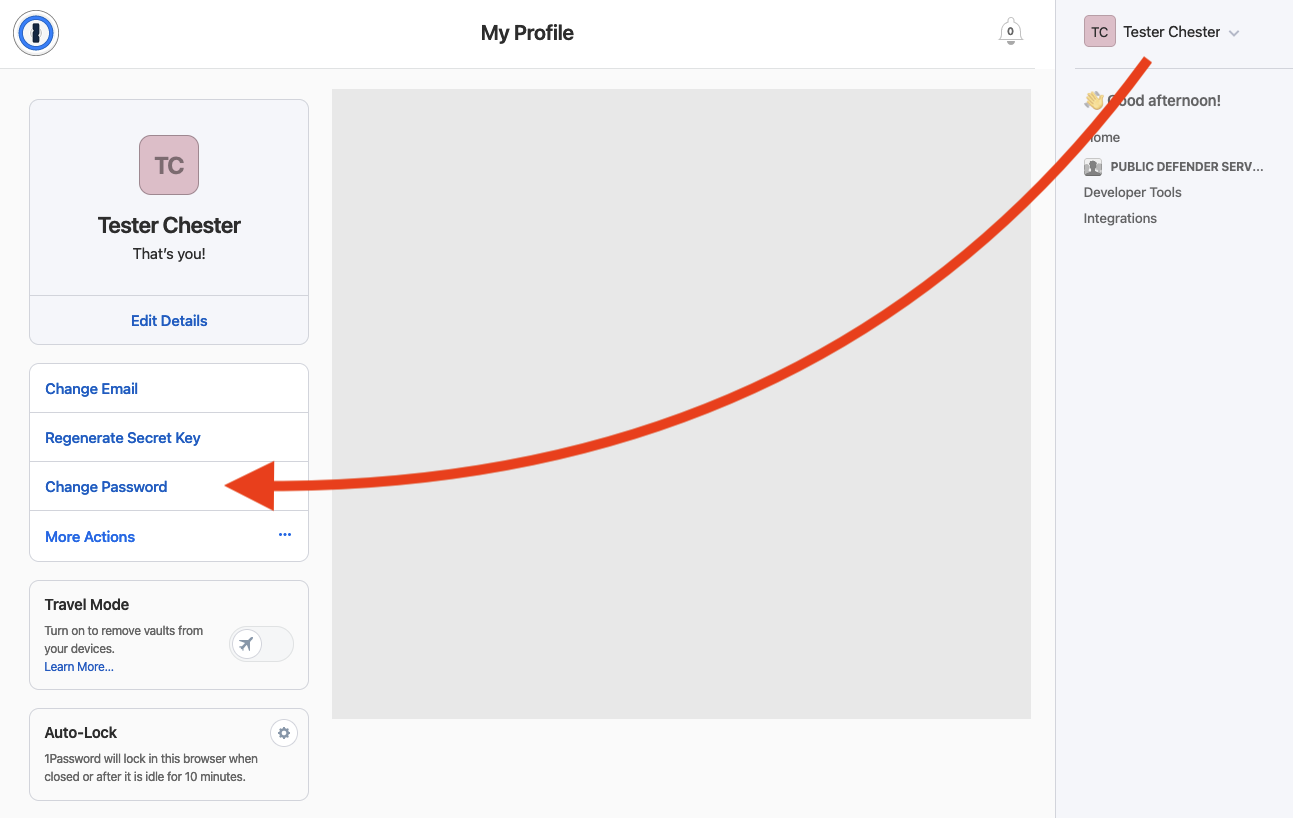
Step 2: Click your name in the top right and choose "My Profile"
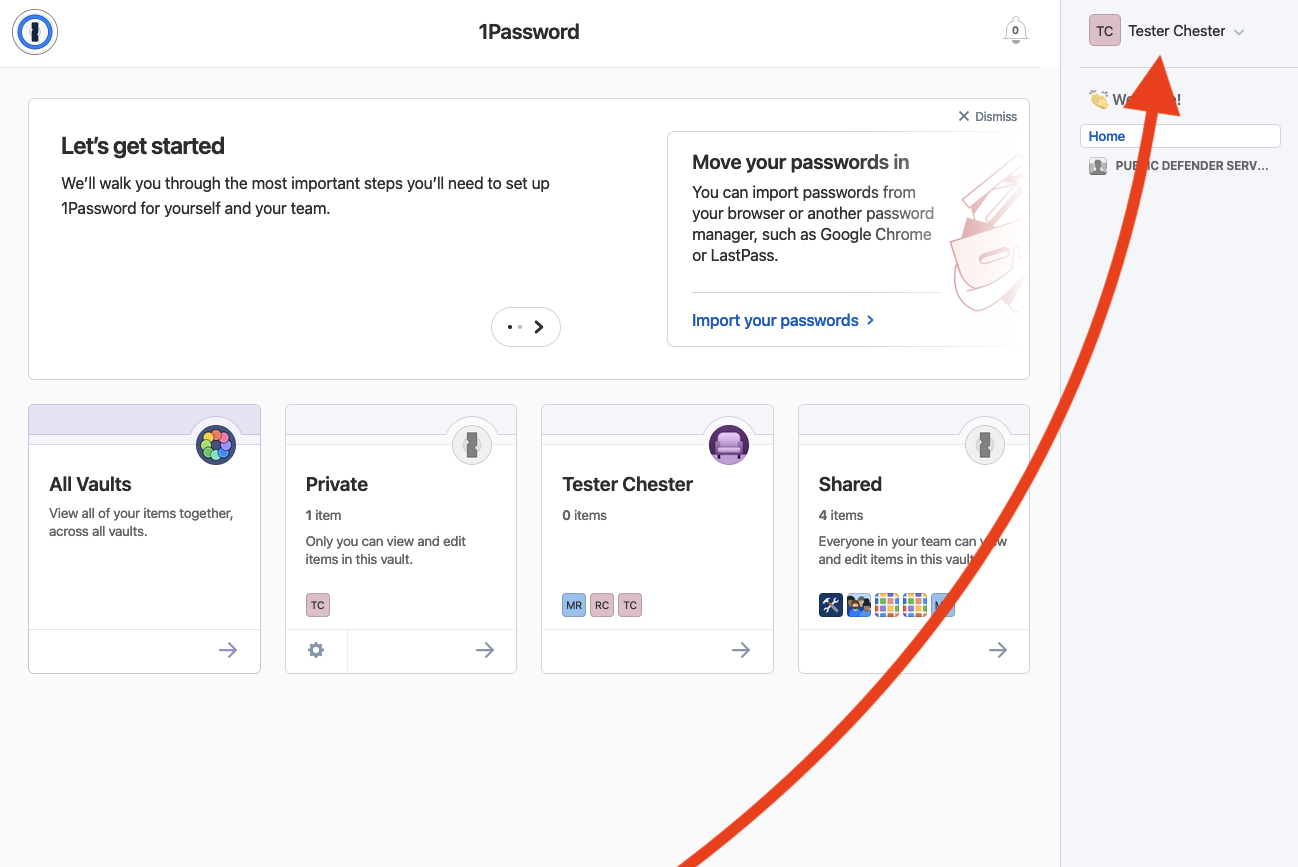
In the top right of the dashboard, you should see your name. Click on your name and a dropdown menu will appear. Click the option named "My Profile" and a new page will load.

Step 3: Click "Change Password"
On the left side of the new page, click the button to "Change Password" to continue.
Step 4: Type in your current master password
Type in your current master password into the "Current Password" field.

🕓
From this point on you will have less than 10 minutes to complete the process before the website logs you out. This timeout can be reset by closing the "Change Password" card, but anything entered will be lost.
Step 5: Edit your 1Password Item in the 1Password app
In the 1Password app — with the 1Password Item selected — click the "Edit" button.

Step 6: Choose your new Master Password
🕓
Remember not to take too long choosing your password, or you will be logged out of the 1Password webpage.
Click in the password field of the 1Password Item, delete the present password, and then type in your new password. Optionally, you can use the "Create a New Password" feature, which is covered later in this step.

For more information on passwords, read the Passwords and URLs section of this guide.
Password Requirements
When creating your new password, you are free to type in any password you like provided it meets the following requirements:
- Your password must use 12 or more characters.
- Your password must include:
- Uppercase letters (
A B C D E F G ...etc ) - Lowercase letters (
a b c d e f g ...etc ) - Symbols (
, . ! @ # $ % ...etc ) - Numbers (
1 2 3 4 5 ...etc )
- Uppercase letters (
Recommended Method
To make things easier, we recommend the following method for choosing a memorable and easy to type password:
Here is an example, but please do not use this as your password.
wordone.Wordtwo5555.wordthree
"Create a New Password" Feature (Optional)
When typing your new password, you may have noticed a button that appears below the field.
If you click this button, it will open a password generator that can create random passwords for you.
When creating passwords we recommend using these settings:
- Type: Memorable Password
- Words: 4
- Separator: Numbers and Symbols
- Capitalize: ✅
- Full Words: ✅

The circular arrow is a button to generate a new random password using the parameters that have been set below it. Each time it is clicked, a new password will be created. When you find something you like, click Use and it will close the password generator and place that password into the field. You can then modify it as needed. Just remember, it must still fulfill the requirements mentioned in the beginning of this step.
Step 7: Save Changes to your 1Password Item
Once you are satisfied with your new password, click the "Save" button. At this point, you've updated the Item for future reference. But remember, your password has not actually been updated for the 1Password account itself. You'll do that on the webpage we had open in Step 4.

Step 8: Copy Your New Password from the 1Password Item
Click the password field to copy the new password.

Switch back to your browser, where you should still have the Change Password prompt open.

Paste your new password into the "New Password" field, and the "Confirm New Password" field.
It won't accept my new password! 😩
If your new password did not meet all the requirements laid out at the beginning of Step 6, you may see a message under the New Password field that looks something like this:
In this case you will need to go back to Step 5 and start again there. Create a new password, save it in the Item, and copy it to the webpage.

Finally click the blue "Change Password" button.
Step 8: Proceed to Section 6
You have now successfully changed your password. Please proceed to Section 6.
Note that you should skip Section 5 unless you haven't setup your iPhone yet. However, you are not required to setup your iPhone on your own; IT will handle that for you. If you have any questions, please contact IT for help.
Section 5: Installing 1Password on your Phone
This next section will guide you in the process of installing the 1Password app onto your phone or other mobile device. This guide only covers Apple devices — such as iPhone — and Android devices. Please select the guide subsection appropriate to the device of your choice.
To complete the mobile device setup, you will need either a Mac with the 1Password app already signed into your account (as covered in Sections 2 & 3) or you will need four things:
• Username (email address)
• Password (a.k.a. your master password)
• Secret Key (a.k.a. access key)
• Sign-in Address
You should have been granted access to these items when you completed the steps in Section 1: Retrieving Your 1Password Account Info. The Secret Key, Sign-in Address, and Username are only needed the first time, then never again for that device. Only your master password is used to unlock the app and access your vault. Please note that even with biometric authentication like TouchID or FaceID, you will occasionally be asked for your master password.
Apple (iPhone/iPad/Apple Watch)
Step 1: Visit the webpage (App Store)
Enter this link on your device:
https://apps.apple.com/us/app/1password-password-manager/id1511601750
You may be prompted to Open this page in the "App Store" and that is OK. Just hit Open. If there is no prompt, you should be redirected automatically to the App Store.

Step 2: Get the App
Tap on the blue "GET" button. The download should begin.
(Note: Depending on your personal settings, you may also be prompted for your Apple ID password.)


Step 3: Open App
Once the app is installed, you can tap the "OPEN" button if you're still in the App Store or you can find the app on your Home Screen.

Step 4: Add Account
Once in the app, you'll see the welcome screen. Hit Sign In to continue.
(Note: If you're adding an account after one has already been added to the app, you may need to go to Settings ➝ Accounts ➝ Add an Account to add a second account.)

There are two methods we use for adding the account:
-
🪄Scan Setup Code (recommended) -
🖐️Enter account details manually
We will cover both here, but for convenience we recommend using the Setup Code.

Method 1: Scan Setup Code 🪄
The "Setup Code" is also known as a QR code, which is a type of 2-dimentional matrix bar code. It stores more data than a traditional bar code, and can be read optically by most mobile devices using a camera. The code contains data that can be read and automatically entered, such as the Secret Key, for a more convenient way of signing in. For security, your password is not included in the Setup Code, and will need to be entered manually later.
Getting your Setup Code
There are two ways to get a setup code:
-
🖥️1Password desktop app (recommended)- Option 1 - -
🌐1Password website through a browser- Option 2 -
We will cover both here, but we recommend using the 1Password desktop app.
🖥️
- Option 1 -1Password desktop app: "Set Up Another Device..."
📌 Note: This is the first method to get your Setup Code. If you cannot complete this, try the other method. If you already have your code, skip to Scanning your Setup Code further down this page.
📷You should have already gone through the setup process for the 1Password app on your desktop/laptop computer or someone may have already done it for you. But if you haven't (or you don't even have the desktop app) you'll need to complete that setup in order to continue here. Talk to IT if you need help.
On your desktop computer...
Activate the 1Password app by clicking on its window or the app icon in the Dock.
Head up to the Accounts ➝
Account/Company Name➝ Set Up Another Device... menu option and click it.
Then in the 1Password app window, a popup should have appeared. Your QR should be visible in that popup.
Do not print, screen capture, or otherwise reproduce your QR code. Only use the 1Password app on your iPhone to scan this QR code.
You now have your Setup Code. To continue, follow the steps in Scanning your Setup Code further down this page.
▼


🌐
- Option 2 -Login to 1Password website
📌 Note: This is the second method to get your Setup Code. If you cannot complete this, try the other method. If you already have your code, skip to Scanning your Setup Code further down this page.
📷Retrieve your 1Password account info. Go to the web address labeled "sign-in address" in a web browser on your desktop computer, adding "/apps" to the end of the address:
https:// EXAMPLE .1password.com/apps
If your web browser has not already been set up with the login credentials, you may need the Secret Key for initial setup. Talk to IT for help if you're unable to log in.
Find the Setup Code
Once you have logged in, you should see a webpage that has the following:
To reveal your setup code, click the Show button under the grey QR code. Your Setup Code should look just like a normal QR code.
Do not print, screen capture, or otherwise reproduce your QR code. Only use the 1Password app on your iPhone to scan this QR code.

Scanning your Setup Code 📷
Now that you have your setup code, we can continue the process of scanning it.
Back on your phone, in the 1Password app, hit Scan Setup Code and you should see the following screen with your camera showing in the app. The app will request access to the camera, please allow access if you want this method to work. Otherwise you will have to enter the account details manually. 🖐️

⛔️ Note:
If access to the camera is not allowed, you will be presented with the following screen.
To grant access, You will need to head to your iPhone's
⚙️ Settings➝✋ Privacy & Security➝📷 Cameraand then activate the switch next to the1Passwordapp.

Now use the camera to capture the setup code on your screen. Point your phone as though you are taking a picture of the QR code.
(Note: the QR code below is not real and will not work. It is only an example for demonstration.)

You will then be prompted to type in your password and finish adding the account.
⚠️
Note: Do not select
Move Dataif that option pops up.
Method 2: Enter account details manually 🖐️
We do not recommend the full manual approach, but it is an option. We recommend using the Scan Setup Code method. If you have already scanned your setup code, skip this portion of this step and proceed to the next heading.
On the Sign In screen, hit Enter account details.
Next you will need:
- The Sign-in Address
- The Email Address for your company account
- Your Secret Key
- Your master Password
If you don't know your secret key or password, contact IT and they can help.
When everything is entered correctly, hit Sign In to continue.
📌
Note: If you need to see what's in the Secret Key or Password fields to verify the text, hit the eye symbol on the right side of the entry.

🧠
Remember: Please do not write down (or print) either the Password or the Secret Key. The password is your "one" password, your master password, and your memorization of it is critical. The Secret Key is kept safe by the IT staff if you need it in the future.
Note: If you successfully sign in using the manual method, you do not need to use Scan Setup Code. Continue to Step 5.
Step 5: Face ID and Settings
If the sign in process was successful you should be greeted with the following screen.
Hit Get Started to continue and move on to the next step.

Face ID
This next part is important! Unless you're really good at and like memorizing and entering passwords! 😉
Make sure you turn on Face ID so 1Password will unlock for you quickly and easily. You may be prompted to grant permission to use Face ID. Make sure to allow 1Password to use Face ID. Hit Next to continue.

Do not save this password...
If you are prompted to save this password to your Keychain, please choose Not Now — we do not want your master password saved anywhere else. Your master password is already stored in the IT vault.

Password AutoFill? It depends...
Turning on AutoFill will allow passwords to be automatically filled when signing in to an account or app. It is recommended to turn off other password filling mechanisms, but this is not right for every situation. If you have a lot of passwords in another system (e.g. Apple's iCloud Keychain / Passwords app), migration is usually needed to make the transition seamlessly, so it may make sense to delay disabling existing password autofillers until you migrate to 1Password Families for personal data, even though it makes daily use one step more difficult.
In other words, if you already have a lot of passwords in another system that you use with AutoFill regularly, it might make sense to leave AutoFill on for both your other system and 1Password. If you need more help deciding which to enable, talk to IT and they can explain it further.
If you don't want to set up AutoFill now, hit Skip to continue and proceed to Step 6. However, if you are enabling AutoFill, you'll need to change some settings.

Enabling AutoFill
As you can see from the 1Password screen, to access your AutoFill settings, you can find them in your iPhone's ⚙️ Settings ➝ 🔑 Passwords ➝ Password Options >. Turning on 1Password allows AutoFill to be done by 1Password.
AutoFill Safari Extension
To get full use of the AutoFill functionality, we need to enable the 1Password extension in Safari. This is done in the iPhone Settings app.
- If you're on iOS 17, navigate to your iPhone's
⚙️ Settings➝🧭 Safari➝Extensions >➝1Password. - If you're on iOS 18, navigate to your iPhone's
⚙️ Settings➝⬜️ Apps➝🧭 Safari➝Extensions >➝1Password.
On the 1Password page, You'll need to enable:
- Allow Extension
- Allow in Private Browsing
And you'll need to tap on and allow the Permissions for 1password.com and Other Websites.


If you correctly enabled AutoFill for 1Password in your iPhone's settings, you should see confirmation of this back in the 1Password app. Hit Done and... you're almost done!

Step 6: A few more Settings (Required!)
There are just a few settings we need to set before we're done. In the 1Password app, open the settings by hitting the icon in the top-left of the app and then Settings in the menu that appears. (Note: the icon might have a custom look rather than a group of people.)

Verify Settings: General, Security, and Privacy
Tap the General tab in the list of Settings.
General
Under the Default Vault heading, make sure "Save new items in:" is set to your named vault e.g. John Doe. It should not be set to "Employee" or "Private" or "Suggest a vault".

We do not use the Employee vault. All your user passwords should be stored in your named vault, i.e. the vault with your personal name. In v7 of 1Password we could turn off the Employee vault, but now we can't in v8. So we just ignore it.
📌
As of May 1, 2024 the name of the "Private" vault has been changed to "Employee" for 1Password business accounts. This change was not made by us but by the developers of 1Password. Please continue to leave the Employee vault empty.
Security
Hit Settings to go back, and then go to Security. On the Security page, make sure the settings are as follows:
- Turn on Face ID or Touch ID (if it isn't on already)
- Set Auto-Lock to 2 minutes or less (default is 2 min)
- Enable "Clear Clipboard"
- Disable "Use Universal Clipbloard..."
- Disable "Always show passwords..."
Privacy
Hit Settings to go back, and then go to Privacy.
Disable "Check for passkeys" because we don't use them.
To reiterate: These are the standardized settings you should have...
- General Tab
- Default Vault
Save new items in:should be set to your named vault e.g.John Doe. It should not be set to "Employee" or "Private" or "Suggest a vault".- Security Tab
Face ID(orTouch ID) should be enabled ✅Auto-Lock on Exitshould be set to 2 minutes or less.Clear Clipboardshould be enabled. ✅Use Universal Clipboard...should be disabled. ❌Always show passwords...should be disabled. ❌- Privacy Tab
- `Check for passkeys" should be disabed. ❌
Done!
Pat yourself on the back, you're all done!... at least with installation.
For further reading, continue to Sections 6, 7, 8, and 9 to learn more about 1Password.
Android Smartphone & Tablet
Step 1: Visit the Webpage
Enter this link on your Android phone: https://1password.com/downloads/android/
Step 2: Tap the Blue Button
Tap on the blue "Download 1Password for Android" button. It will send you to the Google Play store.
Step 3: Tap the Green Button
Tap on the green "Install" button and wait while the app loads onto your phone.

(Please note, improvements to this section are welcome by Android users.)
Step 4: Enter account info
Two ways to do this: 1) Manually. Use all the URL, Secret Key, Username, and Password to fill in as needed on your phone. After initial setup only the password will ever be needed. 2) Scan the setup code.
Setup code:
• Prep by loading this website on your desktop machine:
https://lanepds.1password.com/apps
• Click Show on the Setup Code. (Looks very similar to a QR code.)
• Back on your phone, either as part of the guided assistant or by going to Settings ➝ Add Existing Account ➝ Scan Setup Code. Now use the camera to capture the setup code on your screen.
• Type in your password and finish adding the account.
Note: Do not select Move Data if that option pops up.
Step 5: Configuration (required!)
- Settings ➝ Security.
- Turn off
Lock on Exit- it is super annoying when you're trying to edit things or copy and paste on the rare unsupported site, even if it is more secure. (This setting not required.) - Set Auto-Lock to 2 minutes or less.
- Turn on biometric auth, if available.
- Settings ➝ Vaults
• At the top of this page, tap Vault for Saving and change it to your named vault.
• Tap All Vaults and uncheck Employee.
📌
As of May 1, 2024 the name of the "Private" vault has been changed to "Employee" for 1Password business accounts. This change was not made by us but by the developers of 1Password. Please continue to leave the Employee vault empty.
Done!
Pat yourself on the back, you're all done!... at least with installation.
For further reading, continue to Sections 6, 7, 8, and 9 to learn more about 1Password.
Section 6: Vaults
Understanding Vaults
A crucial concept within the 1Password app is the Vault. A Vault is a container for all the Items which record credentials and secret information. Your account can have access to multiple vaults at a time, even one's owned or shared by another account. This allows for collaboration between team members or more responsive action for IT support.
It's important to keep in mind that an item can only exist in one vault at a time. Just like a file can only exist in one folder. If two users need access to the same item, it must be placed into a vault that both users have access to.
In addition, there are a few categories of vaults you should be aware of. It's important to understand, not so you can create vaults — that will be handled by IT — but rather, so you are aware of which vault a new item is stored in to avoid complications in the future.
Employee Vault (not used)
This vault is only accessible to your account. Our recommendation/requirement is to leave this vault empty and never use it. All your regularly used passwords should be in a vault with your name on it — your "named vault." This is shared with IT for maintenance/troubleshooting. The Employee vault (formerly the Private vault) cannot be deleted or renamed or even disabled. Until the option to hide or disable it is added to 1Password, we must pretend that it's not even there.
📌
As of May 1, 2024 the name of the "Private" vault has been changed to "Employee" for 1Password business accounts. This change was not made by us but by the developers of 1Password. Please continue to leave the Employee vault empty.
Your Named Vault
As the name implies, this vault is assigned to your account and is named with your name. This will be the primary repository for all items containing passwords and other account credentials that you use. Please save login information relevant only to you in the vault with your full name. Examples are your macOS login, Casebase account, Google account, Microsoft account, etc.
Shared Vaults
All vaults other than the Employee Vault can be shared with other accounts, such as other company employees. In a team environment, allowing access to the correct accounts is critical. Many shared vaults exist and access is generally provided based on teams or roles. Who has access to which vault is completely customizable — which makes it a versatile tool.
Where Are Vaults?
Vaults can be found on the left column of the 1Password Mac app or the "Items" tab in the 1Password iPhone app. There you will see a list of Vaults, each of which contains items placed there.

What are Tags?
You might have noticed a heading called "Tags" in the 1Password app. This is another feature of 1Password for organizing items, however you don't need to use it. You may see some items with tags and some without. IT might use the tags feature, but generally it can be ignored. You can think of them like playlists for items; one item can have multiple tags. When you click on a tag in the left column, it will show you all items with that tag.
Section 7: Items — How to Create
Understanding Items
The standard unit of storage in 1Password is the Item. Items store the usernames, passwords, and other important information for each of the accounts you use. You can think of them like individual cards or documents that record all the information. There are large variety of categories that items can fall under. Common categories include Logins, Secure Notes, Credit Cards, Email Accounts, etc.

Most Used Item Categories
Here are a few of the most used categories along with a brief description for reference. Note that items are very customizable. However once an item is created it cannot be converted from one category to another. The category you choose determines what 1Password does with the information, and what pieces of information it expects to be entered.
Login
Login items include fields like username, password, website, and one-time password. This category is used for saving or filling logins. This is generally the widest used category. If it uses a username and password, this is the category to use. Almost all entries should be the Login type.
Secure Note
Secure Note items contain a text field, and that's pretty much it. It can be used for general information that doesn't fit into any specific category. One example might be a description of a method, directions, or a series of steps.
Password
Basically it's the same thing as a Login item. However, it assumes you won't add a username even though you can enter one. If you enter a username when creating or editing a Password item, it will be converted into a Login item. This means that generally this is for things like passcodes for door locks, security systems, devices, etc. Unless you're 100% sure Password is the right type, please use the Login type.
Credit Card
Credit Card items include fields like card number, verification number, and expiry date for your credit and debit card information.
Email Account
Email Account items include fields like username, server, port number, and authentication method. This is useful for setting up email on multiple clients and devices. Generally it's used for email servers that aren't the commonly used services like Google. You shouldn't need to create an email account, but if you are you'll most likely need to use Login instead.
Creating a New Item
Here we'll guide you through the process of creating a new item within 1Password.
Step 1: Click the New Item button
In the top right-hand corner of the 1Password app window, it should be a blue button with the label + New Item. Click it to start the process of creating a new item.

Step 2: Choose an Item Category
Because the Login Item is the most commonly used item in 1Password, we'll use that as an example. While you can choose whichever item you need, the process is relatively similar for all other items. Click on a category name to continue.

Step 3: Enter and Edit Information
You will notice that for a new Login Item there are some fields with text in purple. These fields cannot be removed from the item. But if they are left blank, the field will not appear when viewed normally in the app.

Enter the appropriate information for each field, making sure that information is correctly copied. The information must be identical to that on the website or service. If the information is not correct it is possible to be locked out of an account. Remember that 1Password is only a repository for secret information like passwords; if that information is wrong, it remains that way until someone fixes it.
A List of Fields
Here is a list of the fields for a Login item as it appears in a New Item along with a description of each field.
- title - The name of the Item, usually including the service, website, or user it is for.
- username - Usually an email address, but sometimes it's just something made up.
- password - The secret string of characters for that user.
- website - The website address which is used for "Open and fill" through the browser plugin.
- notes - Text can be added for notes, instructions, or searchable keywords.
- tags - Tags are an extra feature in 1Password that can be used for organization.
For more information about creating passwords, read Section 8: Passwords and URLs.
A Note about Labels ⚠️
Each field has two lines: the
labeland thedata.
The top line (in purple in this example) is the label which tells you what the data is. The bottom line contains the actual data, in this case the username itself. You can edit labels to be something other than just "username" but generally you shouldn't need to. The vast majority of the time you will only be editing the line below the label: the data.

A Note about Websites 🌐
Most Login Items you create will be for services which have a website. In order for "Open and fill" to work correctly, the website address needs to be entered into the
websitefield.
Note also that there are additional fields that can be added to an Item, one of which is the
URLfield. The URL field does not work with "Open and fill" so do not use it for that purpose. For more information, read Section 8: Passwords and URLs.

Adding more fields (+ add more)
You'll notice that there are clickable areas with the label + add more. If you click this, it will display a list of other fields that can be added to the New Item that you are currently working on. You can add as many as you like as needed. Here's a list of available fields for a Login Item:
- Security Questions
- Text
- URL
- Address
- Date
- Month/Year
- One-Time Password
- Password
- Phone
- Sign in with
- Section
- Attach a File
Security Questions
This field is unique to Login Items. Many websites and services require security questions and answers to be added when the account is created as an added layer of security. These questions are usually personal information unique to an individual. However, information like this is not always secure or secret. Which is why we recommend using the random word generator to create more secure answers.

Similar to the password generator, when you click in the second line of the field, you see a card that allows you to generate new random words. Click Use to place the newly created words into the field. You can also customize the question in the field label to match that which is chosen on the service or website. Make sure when you copy the answers to the website that they are identical. Not copying them correctly can result in being locked out of an account. Additionally make sure to copy the questions from the website to the item.
Add as many Security Question fields as is needed with the + add another question button.
Removing a Field
Sometimes you don't need a field you created. In that case they can be removed by clicking the red button on the right end of a field. It looks like a dash inside a circle.

One-Time Password, a.k.a. TOTP
An extremely useful feature for an item is the use of Time-based One Time Passwords (TOTP). They are a bit complicated and require a lot of explanation. For more information, and a guide on how to setup TOTP for an account and add it to a 1Password item, please read Section 9: 2FA/MFA.
Step 4: Save
Before saving, make sure that the Vault selected, next to the Save button, is your Named Vault. It should not be set to Employee.

Once you are finished entering information, and you're confident the information is entered correctly, click the Save button.
Tip ✨
It can sometimes be easier to simply add the title, username, and website, then save and edit the item. If you make errors, don't worry. You can edit the Item later.
📌
As of May 1, 2024 the name of the "Private" vault has been changed to "Employee" for 1Password business accounts. This change was not made by us but by the developers of 1Password. Please continue to leave the Employee vault empty.
Editing Items
To edit an item, select the item in the list to view its contents, then click the Edit button in the top right-hand corner of the window. Alternatively, you can use Command + E (⌘+e) on your keyboard to start editing a selected item.

Archiving Items
Sometimes it's necessary to remove or delete an item. For example, the account has been closed or a duplicate item has been created for the account. To be safe, we have disabled deleting items and instead use the Archive for discarding unwanted items in a vault.
To Archive an item, use the three dot button next to the Edit button, and select Archive. Alternatively, you can right click (or control + click) an item and select Archive from the contextual menu.


Restoring an Archived Item
Archived items can be found in the Archive, down at the bottom of the left column in the 1Password app. The Archive acts just like a vault, being a container for items. To restore an item archived by mistake, use the three dot button or right click an item and select Restore Item.


Section 8: Passwords and URLs
Password Generation
When creating passwords we recommend using these settings:
Type: Memorable Password
Words: 4
Separator: Numbers and Symbols
Capitalize: ✅
Full Words: ✅
Creating New Passwords
Generally, It's a good idea to have at least 2 or more words, 2 or more special symbols (, . ! @ # $ % ...), and two or more numbers. Passwords should also be at least 8 characters in length. Longer is better.
If you are 100% certain you'll never need to type the password feel free to use "random password" which generates passwords like xx-@-P9BWyorjbUaJC.!!Hkeyc . Otherwise, use a password that's easier to type on the off-chance you might need to.
Often you will have to truncate passwords for services - many limit at 16-30 characters. Use longer passwords when possible.
Step 1: Click the "Create a New Password" button

Click in the password field and a button should appear below. Click this to open the password generator.
Step 2: Click the Generate button

The circular arrow is a button to generate a new random password using the parameters that have been set below it. Each time it is clicked, a new password will be created. When you find something you like, click Use and it will close the password generator and place that password into the field.
Step 3: Customize the Password
To make the password easier to type, you can change things around; add or remove words, rearrange the order of things, or insert extra symbols.
A note about Password History 📋
Each time you change the password in an item and save, the prior passwords are kept in the Password History. You can retrieve previous passwords by hovering over the
passwordfield, clicking the down arrow/chevron on the right side, and selectingView password historyfrom the menu.
Saving a Website Address (URLs)

It's important to place the account's login URL under the field called website. This tells 1Password where to go to Open and fill but also allows the browser plugin to recognize what account(s) to suggest for a given website.
When saving website addresses, try to save the login page itself. This means there should be a username/email field to fill in along with a password field.

Generally the address should be short. If it looks long with a bunch of gibberish, it's no good. Long entries are hard to read and may not work. For example a user saved this entry:
https://accounts.google.com/v3/signin/identifier?continue=https%3A%2F%2Fwww.google.com%2F&ec=GAZAmgQ&hl=en&ifkv=AYZoVheAXvzJjhkSv70zpcIlq-OuoDHUD7b8F9CjEjleWNDlp2KergICUQCWyC7XP8d97OnBUL_LIQ&passive=true&flowName=GlifWebSignIn&flowEntry=ServiceLogin&dsh=S-905678533%3A1697146625473206&theme=glif
This entry may cause unintended effects if you open the app and click Open & Fill. So avoid putting URLs like that into the website field in your 1Password entry.
Instead, use either:
https://www.example.com/login
or just:
https://www.example.com/
Some websites have sign-in or login popups within the webpage. For those cases, just put the main domain URL (https:// www. example .org/). The broader entry is better if you're not sure about the exact login address or just don't care to be too specific. Use more specific entries (like the one including wp-login.php) if you want to be able to click on the entry in 1pw and have it open the site and fill in your details for you.
Section 9: 2FA/MFA
Before Reading...
2FA & MFA are advanced level concepts. If you haven't learned how to use 1Password effectively or are still struggling to be confident using it, do not read this section yet. We would advise spending more time with 1Password until you've gained enough experience to attempt more advanced level functionality and concepts. These concepts can be somewhat confusing, so once you're sure you've got the basics of 1Password down, return here and continue reading to expand your knowledge of passwords and security.
Introduction to 2FA & MFA
This guide is meant to give you an overall understanding of Two-Factor Authentication and Multi-Factor Authentication. In addition, there's an example for how to add Time-based One Time Passwords as a second factor on an account to 1Password. The example is for Microsoft 365 but is general enough for most other kinds of accounts.
Understanding Multi-Factor Authentication
Multi-Factor Authentication (MFA) is a method for identifying and granting access to users on computers, applications, websites, and other portals. Two or more factors are used in the process of identifying and allowing access for a user. A user must have/submit all factors in order to be granted access to whatever platform they are attempting to use.
A Note about Passkeys 🚫
Passkeys are a newer system of linking people and accounts with biometric authentication and no actual password. The thought being that a password cannot be compromised if it doesn't exist. As more companies and services begin adopting this authentication method, you will start seeing this appear as an option more and more. While this has merit for home use, this particular feature is not as useful to us at a company level, as it doesn't provide a balanced approach to both security and flexibility. We highly recommend that passkeys never be used for company purposes.
Background
The typical user credentials most of us are used to these days include a user name and password. In the past, a memorable string of characters (e.g. "abcd1234" or "mydogmax") was secure enough. The more characters— and types of characters (e.g. numbers 0 - 9, letters a - z and A - Z, specials . , _ - ! @ # $ ... etc)— the more secure it was because it was harder to guess.
The Need for More Security 🔒
However the ever increasing power of computing allows attackers/hackers to guess short passwords rather easily. This can be helped by increasing the number of characters used and using less predictable patterns.
For example, 55 is much easier to guess than 25797142593691473697 and apple is much easier to guess than ixqvt.
But can you imagine trying to type— much less remember— a crazy password like {oGxQS"ipZ)*2]'#pnP9/\sK? No! Which is why we try to create passwords that are easy to remember and type, like pumpkin.Engine82. But, a short password like that isn't enough. We could go longer (pumpkin.Engine82-harpIcon_Door!Toadstool) but the longer it gets, the harder it is to remember. Plus, even a password like this could be guessed with enough time. We need a better way. This is where MFA comes in to save the day.
What is Multi-Factor Authentication, really?
Put simply, we use multiple "factors" such as passwords, physical items, access to lines of communication, and biometric information to authenticate a user instead of a single factor like just a password. You might already be familiar with a type of MFA called Two Factor Authentication (2FA). The most common 2FA people know of today uses SMS text messages or email sent to your phone or computer with a one time use code.
Two Factor Authentication 🔑 🗝️
Two Factor Authentication (2FA) is a type of MFA. Basically, 2FA is MFA but just using two factors. That's why you will sometimes hear 2FA and MFA used interchangeably. Having a second factor besides a password adds a layer of work for attackers/hackers to perform beyond just guessing your password. They would have to guess your password and have access to your phone or email. And while it's trivial for us to just have our phone with us or log into our email accounts, it's another step for nefarious actors that isn't so trivial.
📌
A Note about Two Step Verification (2SV)
You might run across a similar term to 2FA called 2SV or "Two Step Verification. Generally you'll see this terminology from big tech companies like Google or Microsoft. For the most part you can think of 2FA and 2SV as being similar but there are some specific differences. Two Step Verification involves multiple steps where you provide one factor at a time. Two Factor Authentication can involve steps or not, but like 2SV uses two factors. So you could think of 2SV as a type of 2FA, but there's more nuance around the terms that are outside the scope of this guide. Just be aware that the term exists and can sometimes be confused with 2FA.
Why we don't like using SMS for 2FA 📵
SMS text messages may be convenient, but unfortunately they're not as secure as you might think. Hackers have found ways to spoof sim cards, reroute text messages and calls, or even just convince your carrier to hand over your number to them on another phone using social engineering. And because a lot of platforms allow you to reset your password just by having the second factor (one time code via SMS), attackers sometimes don't even bother with the password anymore — opting to just attack the path of least resistance. For this reason, we shy away from using SMS for 2FA and instead use something else.
Additionally, 1Password does not support SMS. But 1Password enables us to use a form of 2FA even with shared credentials, for certain types of accounts.
What We Use Instead for 2FA
Many platforms, accounts, and portals have the option of using another kind of second factor called Time-based One Time Password (TOTP). 1Password can store the TOTP along with your usual password so you never have to remember either. It works somewhat like the codes you might receive on SMS, but instead they are never transmitted to you once you have TOTP set up. They are instead generated by your device locally.
What is a Time-based One Time Password?
Imagine if your password changed every minute. That would make things complicated! How would you know which password is next? Well, someone figured that out. When you set up a TOTP, you are given a "secret code" usually in the form of a QR code. The "secret code" is just a really long string of characters. You don't need to know much about the "secret code" but if you place it in a 1Password item, the app can use that "secret code" for something really clever.
Once the "secret code" is entered into a 1Password item alongside your normal password, you'll see a short number — a string of six digits — that changes every 30 seconds.

This short number is a one-time password that will only work once for that moment in time; usually 30 seconds. It's a pseudo-random number that is generated locally on your device using a special algorithm that uses the "secret code" and the time of day as inputs. The special algorithm spits out a six digit number unique for you at that specific moment. Essentially, it's like having a password that is only valid for a short period of time; a one-time use password. And because it's generated using the current time, it is a time-based "one time password" — i.e. TOTP.
Because the service/website you're trying to log into also has a copy of the "secret code" and the current time, when you try to log in, they're able to generate the exact same "random" number on their end. And as long as both your clock and their clock are in sync, you will both generate the same number. When you send that one-time password they know it's you because the numbers match. But once it's been used, it can't be used again. Attackers can't intercept it and use it before you can. This makes it vastly more secure than SMS 2FA. The "secret code" is nearly impossible to guess, even if attackers managed to obtain a few of those six-digit codes, they couldn't reverse engineer the secret.
Why Not Just Use TOTP Without a Password?
That's a good question. Having multiple factors makes things more secure. The more different factors we have, the more complicated it is for an attacker to obtain the credentials they need to gain access where they're not supposed to.
1Password: Everything in One Place
Some of you may be saying: What?!? Aren't we invalidating the extra security by saving both the user/pass and the second factor in a single system? Yes and no; having 2FA enabled still protects us against casual sharing and phishing, since for the 2FA to work you need a code that's only valid for 30 seconds.
Our 1Password accounts are protected by a very long Access Key plus user/pass (and team URL,) and so even without 2FA enabled on the 1Password account itself, there are still security measures present - the "one password of 1Password" is just for you, not hackers!
1Password
As stated before, 1Password cannot support text message (SMS) based 2FA. Therefore we are relying on app-based TOTP as a second factor for all accounts where available.
For accounts that you only use (i.e. not shared), please enable 2FA with a TOTP when available. Do not use proprietary authenticator apps for 2FA such as the Microsoft Authenticator or the Google Authenticator; only use 1Password. We only want to use a TOTP when available for 3rd party apps (i.e. 1Password).
When a TOTP for 2FA is not available, please use stronger passwords instead. If the account forces you to use 2FA (i.e. you cannot leave 2FA disabled) then use SMS based 2FA. You may also use SMS based 2FA when it makes sense to do so, but preference is for not using 2FA and just using stronger passwords.
For accounts that you and others use (i.e. shared), do not enable 2FA yourself. The IT staff will set up 2FA for you where appropriate.
Note: At this time we are not using 2FA for the 1Password account itself. Again, there is already more than just a user/pass needed for access and initial setup, so TOTP along side your master password is unnecessary.
To reiterate:
-
If the account is added to a 1Password item that is in your vault (accounts that you only use, i.e. not shared) it is strongly preferred that the account have 2FA enabled with an app-based TOTP.
- If 2FA with a TOTP on a 3rd party app (i.e. 1Password) is not available, do not use 2FA. We instead use stronger passwords (or SMS 2FA when it makes sense).
- If 2FA is forced for the account, use SMS 2FA
- Do not enable 2FA yourself for accounts that are shared. The IT staff will handle setting up 2FA for shared accounts.
How to add 2FA (TOTP) in 1Password
Note: For demonstration, we will be using Microsoft 365 as the account enabled with 2FA and adding the TOTP into 1Password. The process will be different for each website/service. So for each unique situation, you will have to use your best judgement. Be aware also that not all website/services support TOTP. In those cases where TOTP is not supported for 3rd party apps, we do not enabled 2FA. However if 2FA is required/forced, we will then use SMS as a last resort.
Step 1: Sign into the service/website
In this case — since we are using Microsoft 365 as an example — we will be going to office.com and signing in.

Enter the account credentials (username and password), and click Sign in.
Step 2: Locate 2FA Settings
It may not be obvious at first where to find this. Usually it will be in something like "Account" or "Settings" and under a heading like "Security."
In the case of Microsoft 365, head up to the top right of the site, and click the circle with the account initials, then on View account.

From there click on the Security info heading and then click on Add sign-in method.

Step 3: Add or Enable TOTP 2FA
At this point you will then need to "add an authenticator" to your account. Our "authenticator" app is 1Password itself. Some services have their own apps. We do not use them. We only use 1Password. If you do not seen an option to use TOTP on a 3rd party authenticator stop and do not set up 2FA. If the service is forcing 2FA to be enabled and you have no choice, in that case you will need to use SMS as a last resort.
On Microsoft 365, after you clicked "Add sign-in method," a prompt should have appeared with a dropdown menu containing multiple options.

Click "Choose a method" to expand the dropdown menu and select "Authenticator app" from the list.

Click Add to continue.

Microsoft will prompt you to use their authenticator app. We do not use their app.
Click the link that says "I want to use a different authenticator app" near the bottom.

You will then be prompted to "add a new account" but this language can be ignored. What they mean is to prepare the item in 1Password, however you should already have an item in 1Password at this point. Click Next to continue.

Step 4: Scan the QR Code Using 1Password
When enabling 2FA with TOTP in most services, you should be shown a QR code. However in other cases you may be asked to follow a different set of instructions not covered here. Follow whatever steps are necessary to add the TOTP "secret code" to 1Password or contact IT for assistance.
You should then see the following prompt including a QR code. In the example image below, the QR code has been altered for security purposes and will look different for you.

Over in 1Password — within the item for the Microsoft 365 account — you should see a banner:

Clicking on it reveals the following:

Click the Scan QR code button.
I can't find the Two-factor authentication banner in 1Password! 🤷♂️
If you don't see the banner and there isn't a one-time password already set up for the account, you can add the TOTP by editing the account item, clicking on
+ add moreand then choosingOne-Time Password. You can then click the Scan QR code button indicated by the image below.

1Password will attempt to look for the QR code on your screen. Make sure the QR code from the website is visible when telling 1Password to perform a scan. If successful, you should see the following notification at the bottom of the 1Password app.

Potential Issues at this Stage...
QR code detection failed.
If the One-time password is not detected on screen, you will see the following notification at the bottom of the 1Password app instead of the previously mentioned one.

There are a few possible reasons for this:
- 🔴 The Screen Recording Permission has not been enabled.
- 🙈 The QR code is not visible on screen
- 🔍 The QR code is too small
See the below answers for these possible solutions. If you verify all three and are still having trouble, contact IT for help.
🔴 Screen Recording Permission

If this is the first time you've tried to scan QR codes with 1Password, you may be prompted to grant screen recording permission to the 1Password app.
Open System Settings and go to Privacy & Security and then click Screen Recording.
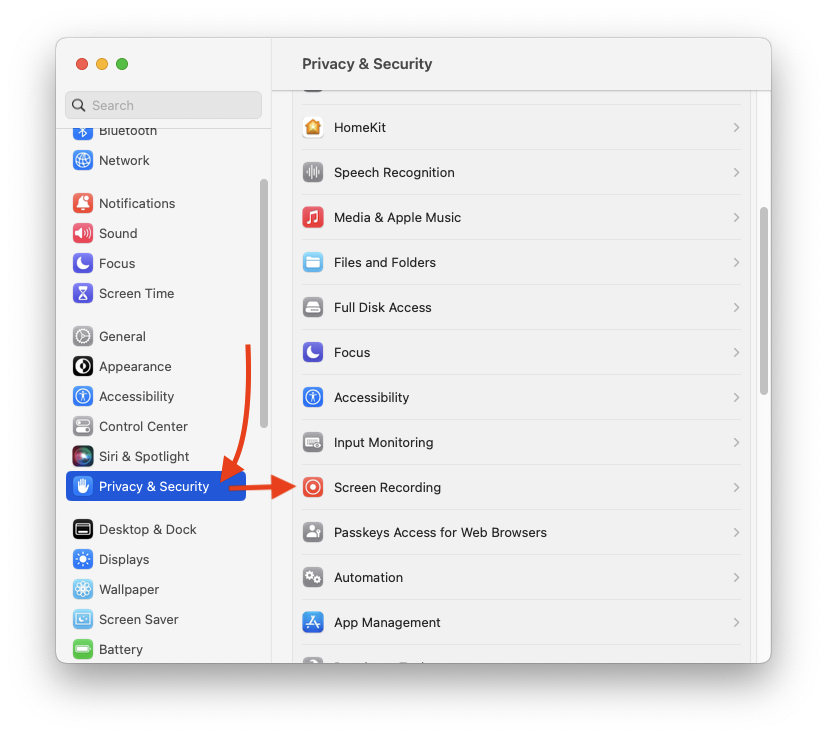
Next, in the list of apps displayed, enable Screen Recording for 1Password.
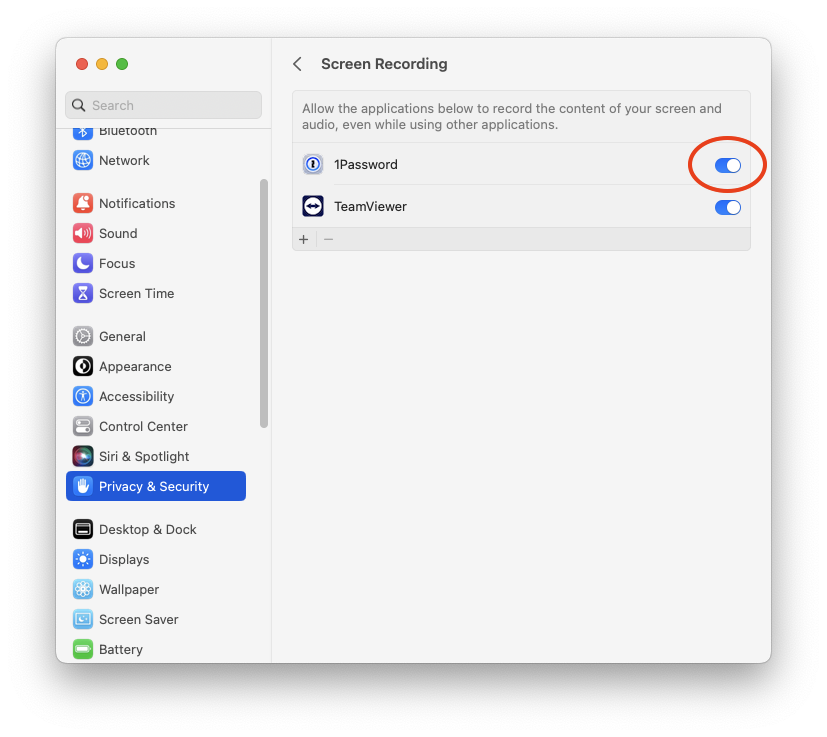
You may need to use Touch ID or Use Password to change the setting. Then you may be prompted to Quit & Reopen the 1Password app. Do so.
🙈 The QR code is not visible on screen
Make sure the window with the QR code is visible on your screen. Because the app uses a screen capture and looks at your entire screen, if you can't see the QR code, neither can the app! Position the windows such that you can see the full QR code at the same time you click the Scan QR code button in 1Password.
🔍 The QR code is too small
If the QR code is plainly visible, the app might be having difficulty recognizing the QR code because of the size and resolution of the image. In your web browser, try increasing the view size by going to the View menu and selecting Zoom or Zoom In. You can also press Command + Plus (⌘ +) on your keyboard. Keep zooming in and trying to Scan QR Code in the 1Password app until successful. If you've zoomed in beyond 200% and you still receive a "detection failed" message, contact IT for help.
Don't forget to return your browser's zoom back to 100%! (⌘ - or ⌘ 0)
Step 5: Finishing up
If the Scan was successful, you should now see a six digit code that changes every 30 seconds, indicated by a countdown timer next to the code.
Back over on office.com click Next to continue. You will then be prompted to enter one of the six digit codes that is now being displayed in the 1Password app under the heading "one-time password." This is to verify that the TOTP was added correctly and is generating the codes as expected.
Enter the code displayed, and hit Next. If it fails, the code entered may have just expired, so try, try again. If it fails multiple times, contact IT for help.

If successful, you should now have a TOTP added to the account.

⛔️ Important note!
Often you will be offered either a recovery code, or a bunch of one-time codes. This is a rescue system and it is critical that all codes provided are saved to the 1Password item!
If it's a single code save it in a new field in the same item as a password (not the main password!) Should look like this:
Again, do not replace any password with this one. Do not replace the main account password, do not replace the "one-time password" which is the primary 2FA system. This is a third, completely separate entity.
If you are not confident you're doing this correctly, do not proceed! This warning is from Hover but succinctly covers why:
(Ignore the "phone" references, it means "1Password app" to us. Also, do not write the codes down, print them, or store them anywhere but in 1Password. As above, do not proceed with enabling 2FA if you're not positive regarding all actions.)

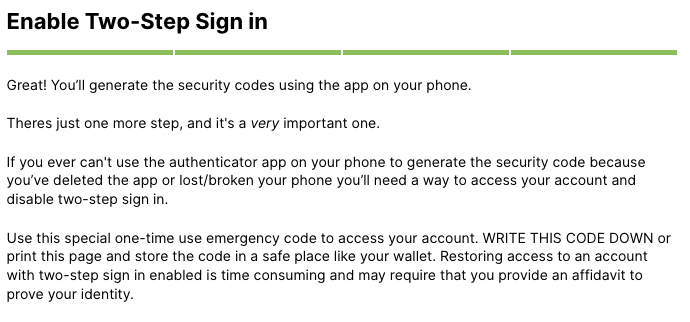
Done!
You've successfully added a TOTP to an item in 1Password!