Drive Integrity Checks
Overview
Working with video creates a tremendous amount of data. In order to avoid ever-increasing costs for fast, redundant, and fully backed up servers, raw footage is archived so that only the project files and the current footage need to be supported (fast/redundant/backed up.)
Background
The primary server has both AMIFootage and TheAttic. New raw footage is stored in numbered folders on AMI Footage and monitored for size. e.g.
AMI Footage 1
AMI Footage 2
[...]
AMI Footage 20/
AMI Footage 21/
AMI Footage 22/
[...]
As the footage folders are filled to the size of a single hard drive - which varies over time and is not a set size - an archival process occurs. This document covers exactly how to prep the data and drives for archiving, and ignores the standard backup mechanisms in order to keep this document shorter.
Primary server as of 6/1/21 is at IP 10.101.0.4, and is a container based vm running on amipve2, a Supermicro based 36 bay 4U server. File server name is the same as the old server, amifs. Storage for amifs comes from a bind mount to a zfs pool on the host.
The old server, a Mac Pro with DAS (Direct Attached Storage,) is the backup target, and since it has "toasters" i.e. one or more single or dual hot-pluggable drive bays systems, is the backup target and archive management system.
We could run badblocks and smartctl natively on amipve2, but any mistakes would be affecting the production system and would be extremely costly, so it's a better idea to use a different system.
Archive Step 1, Drive Prep
Before we run any operations we need to verify we're working with the correct drives.
-
Login to the old server. If you know how to use the
screenbinary in ssh that's fine, otherwise please use ARD (Apple Remote Desktop / VNC) and the Terminal application. -
In addition to
Terminalapp, launchDisk Utilityfrom the Utilities folder. -
Using
Disk Utilityclick on the device (not volume, the volume is the nested item) and look for Device in the lower right hand corner of the window, circled in red here: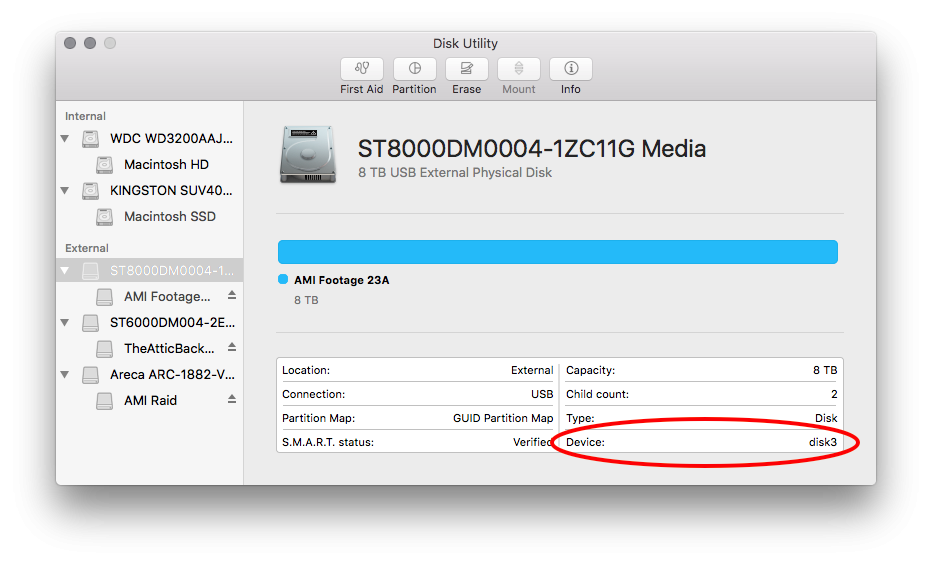
-
With Terminal.app open, customize this command and paste it in:
smartctl -i -d ata /dev/disk3
Commonly this will be disk2 or disk3 on this system, disk0 is the boot drive and disk1 is the boot clone. Device numbers cannot be relied on to stay consistent, even if they generally do. Since one of these tests is destructive and has no "Are you sure?" checks, we must be 100% sure before running the command.
- Next, paste in this command and verify the
model:model. Example output:
amifs:~ admin$ smartctl -i -d ata /dev/disk3
smartctl 7.2 2020-12-30 r5155 [Darwin 15.6.0 x86_64] (local build)
Copyright (C) 2002-20, Bruce Allen, Christian Franke, www.smartmontools.org

=== START OF INFORMATION SECTION ===
Device Model:     ST8000DM0004-1ZC11G
Serial Number:    ZA250LBZ
LU WWN Device Id: 5 000c50 0afd684a4
Firmware Version: DN01
User Capacity:    8,001,563,222,016 bytes [8.00 TB]
Sector Sizes:     512 bytes logical, 4096 bytes physical
Rotation Rate:    7200 rpm
Form Factor:      3.5 inches
Device is:        Not in smartctl database [for details use: -P showall]
ATA Version is:   ACS-3 T13/2161-D revision 5
SATA Version is:  SATA 3.1, 6.0 Gb/s (current: 6.0 Gb/s)
Local Time is:    Mon Nov  1 11:33:48 2021 PDT
SMART support is: Available - device has SMART capability.
SMART support is: Enabled
UnfortunatelyFor this system we do not want any of the following:
Model Family:     Kingston SSDNow UV400/500
Device Model:     KINGSTON SUV400S37240G
Serial Number:    50026B77640B47F1

Model Family:     Western Digital Caviar Blue Serial ATA
Device Model:     WDC WD3200AAJS-41VWA1
Serial Number:    WD-WCARW5800914

Model Family:     Seagate BarraCuda 3.5
Device Model:     ST6000DM004-2EH11C
Serial Number:    ZA1BYVNJ

Read Device Identity failed: empty IDENTIFY data
The last entry is for the raid array: naturally we cannot get disk info when pointed at a controller or the array managed by the controller (which itself manages the disks.) Regardless, running badblocks on this device would likely irreversibly destroy all content on the backup aray.
For this example only, we have shown disk3 is a valid target. To avoid mistakes which could involve data loss, I am changing this to disk99. Please use the verified disk number you found above, between Disk Utility and smartctl instead of disk99!
Archive Step 2, Drive Checks
SMART Tests / Drive Self Tests
- In Terminal, use the device identifier verified above in place of
disk99, and run this command for each drive:
smartctl -t long -scand ata /dev/disk99
You will see text similar to this:
smartctl 7.2 2020-12-30 r5155 [Darwin 15.6.0 x86_64] (local build)
Copyright (C) 2002-20, Bruce Allen, Christian Franke, www.smartmontools.org

=== START OF OFFLINE IMMEDIATE AND SELF-TEST SECTION ===
Sending command: "Execute SMART Extended self-test routine immediately in off-line mode".
Drive command "Execute SMART Extended self-test routine immediately in off-line mode" successful.
Testing has begun.
Please wait 727 minutes for test to complete.
Test will complete after Tue Nov  2 00:54:07 2021 PDT
Use smartctl -X to abort test.
amifs:~ admin$
- Note the "test will complete" text. After the noted time, check the status of the extended/long self test:
smartctl -a -d ata /dev/disk99
You should see "Completed without error" in the SMART Self-test log shows only internal devices.section:
SMART Self-test log structure revision number 1
Num  Test_Description    Status                  Remaining  LifeTime(hours)  LBA_of_first_error
# 1  Extended offline    Completed without error       00%         2         -
https://binaryfruit.com/drivedx/usb-drive-supportContact Reinmuth Consulting if you have anything other than "Completed without error" - errors generally mean the drive is unsafe to use, but not always.
Sector Verifications
sshWe admin@10.101.0.5
Do on ANY drive with data!!/usr/local/opt/e2fsprogs/sbin/not run badblocks
Archive Step 2,3, Data Transfers
- Launch Carbon Copy Cloner.
- Click on the
Footage Clone, modify as neededtask from the task list on the left. - Ensure
AMIFootageis mounted. If not mounted, Finder -> Go -> Connect to Server and paste in:
smb://backupserver@10.101.0.4/AMIFootage
- Drag the folder you're intending to copy to
Notes
Unfortunately smartctl --scan shows only internal devices.
https://binaryfruit.com/drivedx/usb-drive-support
ssh admin@10.101.0.5
/usr/local/opt/e2fsprogs/sbin/badblocks
amifs:~ admin$ smartctl --scan IOService:/AppleACPIPlatformExpert/PCI0@0/AppleACPIPCI/SATA@1F,2/AppleAHCI/PRT2@2/IOAHCIDevice@0/AppleAHCIDiskDriver/IOAHCIBlockStorageDevice -d ata # IOService:/AppleACPIPlatformExpert/PCI0@0/AppleACPIPCI/SATA@1F,2/AppleAHCI/PRT2@2/IOAHCIDevice@0/AppleAHCIDiskDriver/IOAHCIBlockStorageDevice, ATA device IOService:/AppleACPIPlatformExpert/PCI0@0/AppleACPIPCI/SATA@1F,2/AppleAHCI/PRT3@3/IOAHCIDevice@0/AppleAHCIDiskDriver/IOAHCIBlockStorageDevice -d ata # IOService:/AppleACPIPlatformExpert/PCI0@0/AppleACPIPCI/SATA@1F,2/AppleAHCI/PRT3@3/IOAHCIDevice@0/AppleAHCIDiskDriver/IOAHCIBlockStorageDevice, ATA device